
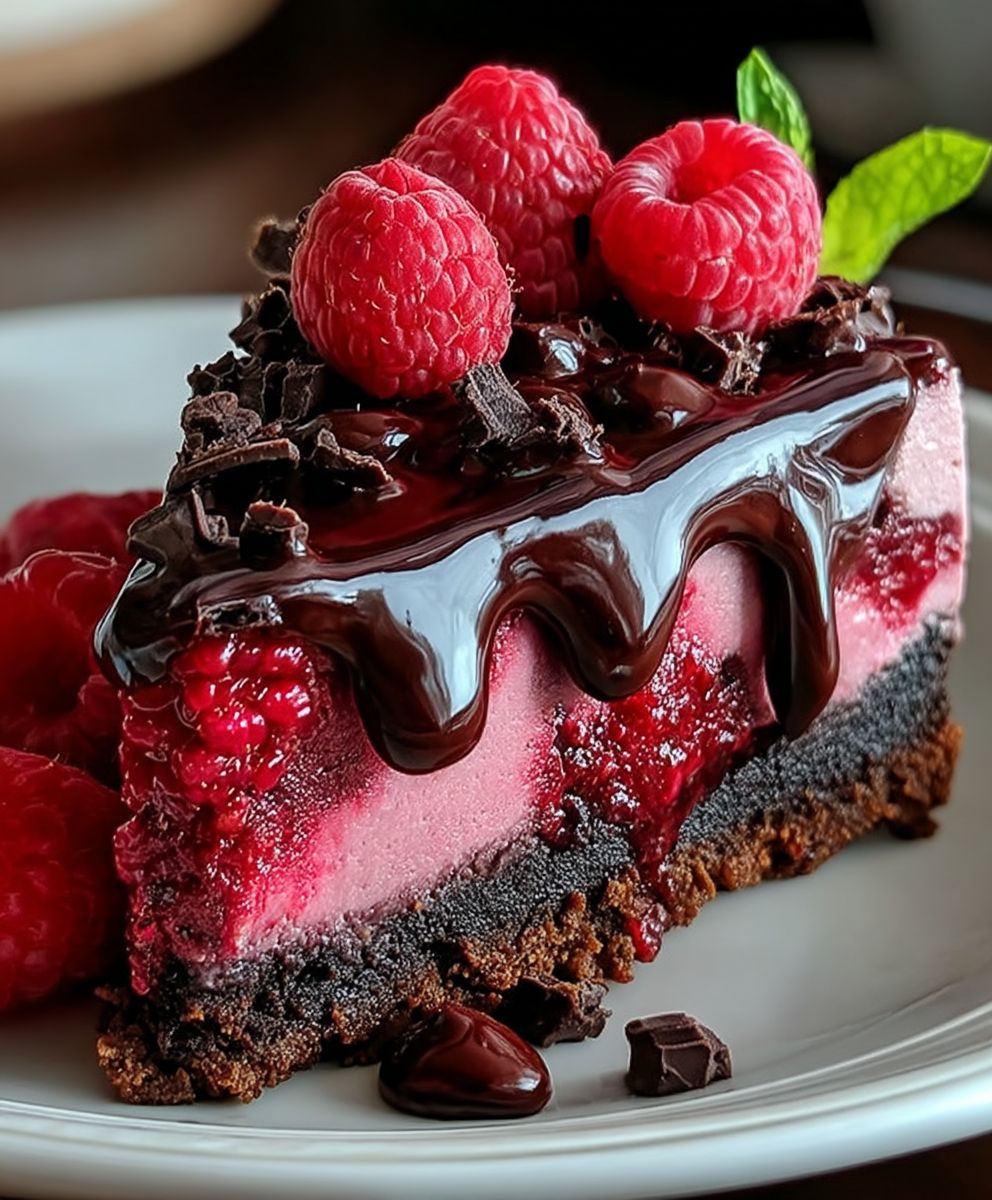
When the calendar hits that point in the year where the days feel too long and your patience has entirely evaporated, you need a culinary hug—and not just any hug. You need the kind of dessert that silences the room upon its arrival. That moment is exactly why you need toIndulge in Decadent Dark Chocolate Raspberry Cheesecake. Forget complicated techniques and stressful oven vigil; this recipe is the reward you earned just by surviving another Tuesday. It’s the ultimate combination of bitter, sweet, and tangy, wrapped up in a creamy, velvety blanket of pure bliss.
My quest for the ultimate cheesecake began after a catastrophic baking failure involving a regular lemon tart that somehow managed to collapse like a sad soufflé attempting a low-altitude jump. I realized that if I was going to invest hours in chilling, mixing, and worrying about a water bath, the results had better be dramatic and life-altering. This cheesecake is my redemption song—a towering achievement that demands respect, yet is surprisingly manageable for even the most humorously clumsy home cook.
This dessert isn’t just a cake; it’s an experience. It’s a bold statement that says, “Yes, I deserve this level of chocolate intensity,” followed immediately by the bright, joyous rebuttal of fresh raspberries. It strikes a balance that prevents the darkness of the chocolate from becoming too overwhelming, allowing the creamy, tangy cheesecake base to shine through brilliantly.
Here are the defining features that make this cheesecake a legendary treat:
- The intense, bittersweet dark chocolate crust provides a perfect structural foundation and a deep, cocoa richness that complements the filling exquisitely.
- A luxurious, velvety smooth cream cheese filling that achieves peak richness without requiring complex or fussy preparation steps or ingredients.
- The vibrant crimson raspberry swirl offers a tart counterpoint and visually stunning marbling, elevating the dessert’s aesthetic appeal instantly.
- This recipe is adaptable for various occasions, transitioning seamlessly from a sophisticated holiday centerpiece to a casual, impressive weekend dessert.
Ingredients for Indulge in Decadent Dark Chocolate Raspberry Cheesecake
Here’s what you’ll need to make this delicious dish:
- Dark Chocolate Sandwich CookiesThese crushed cookies form the rich, dark base. Ensure they are fully pulverized for a tight, cohesive crust.
- Unsalted ButterEssential for binding the crust together. Melt it gently to ensure proper saturation of the cookie crumbs.
- Cream CheeseUse full-fat brick cream cheese, ensuring it is completely softened to room temperature for a lump-free filling.
- Granulated SugarProvides the necessary sweetness and texture to the creamy filling.
- EggsAct as the primary binding agent. They should also be at room temperature to incorporate seamlessly into the batter without overmixing.
- Vanilla PowderAdds a critical layer of aromatic complexity that enhances the overall flavor profile of the cheesecake base.
- Cocoa Powder (Dutch-Process)Used both in the crust and sometimes lightly dusted on the finished product for an extra layer of dark chocolate intensity.
- Fresh or Frozen RaspberriesCrucial for the vibrant, tangy swirl and sauce. If using frozen, do not thaw them completely before cooking the sauce.
- Cornstarch or Plant-Based PectinUsed to thicken the raspberry sauce, ensuring it holds its shape beautifully when swirled into the filling.
- Lemon JuiceA small amount brightens the flavor of the raspberry sauce, cutting through the richness of the cream cheese.
The full ingredients list, including measurements, is provided in the recipe card directly below.
The Art of the Dark Chocolate Crust
The crust often gets overlooked, but it is the anchor of any excellent cheesecake. For this recipe, we bypass the generic graham cracker route and dive headfirst into the decadence of dark chocolate sandwich cookies. When crushed and mixed with melted butter, they create a dense, deeply flavored foundation that stands up brilliantly to the hefty filling. The key here is uniformity; you want the crumbs to be almost like fine sand, eliminating any large chunks that might cause the crust to crumble when sliced. Pressing the crust firmly into the springform pan, using the bottom of a measuring cup, ensures it maintains integrity throughout the baking and chilling process. Remember, a sloppy crust leads to a structural catastrophe later, and nobody wants their slice of perfection to disintegrate upon serving.
How to Make Indulge in Decadent Dark Chocolate Raspberry Cheesecake
Follow these simple steps to prepare this delicious dish:
Step 1: Constructing the Chocolate Fortress
Preheat your oven to 325°F (160°C). Prepare a 9-inch springform pan by lining the bottom with parchment paper and lightly greasing the sides. In a medium bowl, combine the finely crushed dark chocolate cookies and melted unsalted butter. Press this mixture firmly into the bottom and slightly up the sides of the prepared pan. Bake the crust for 8 to 10 minutes to set it, then remove it from the oven and let it cool completely while you prepare the filling.
Step 2: Preparing the Raspberry Swirl Sauce
While the crust cools, combine the raspberries, a small amount of sugar, and lemon juice in a saucepan. Bring the mixture to a simmer, crushing the berries gently. In a small separate bowl, dissolve a teaspoon of cornstarch (or plant-based pectin) in cold water to create a slurry, then whisk it into the simmering berry mixture. Cook until thickened, about 2 minutes. Strain the sauce through a fine-mesh sieve to remove the seeds, yielding a smooth, intense raspberry reduction. Allow the sauce to cool completely before using it for the swirl.
Step 3: Whipping the Velvety Filling
In a large mixing bowl, beat the softened cream cheese and sugar together on medium speed until the mixture is entirely smooth and fluffy, scraping down the sides often. It is paramount that there are absolutely no lumps remaining. Beat in the vanilla powder. Reduce the mixer speed to low and add the room temperature eggs one at a time, mixing only until just incorporated. Overmixing the eggs introduces too much air, which leads to cracks during baking. This filling must be dense, not airy.
Step 4: Swirling the Masterpiece
Pour about two-thirds of the cream cheese filling over the cooled crust. Drizzle half of the cooled raspberry sauce over the filling. Pour the remaining cream cheese filling on top, followed by the rest of the raspberry sauce. Use a butter knife or skewer to gently create deep swirls, ensuring you drag the knife through all layers without disturbing the crust. Prepare a water bath by wrapping the springform pan tightly in heavy-duty aluminum foil and placing it in a larger baking pan.
Step 5: Baking Low and Slow
Carefully pour hot water into the outer pan until it reaches halfway up the sides of the foil-wrapped springform pan. Bake for 60 to 75 minutes, or until the edges are set and the center still has a slight wobble when gently nudged. Turn off the oven, prop the door open slightly, and leave the cheesecake inside the cooling oven for one hour. This gradual cooling prevents sudden temperature changes, which are the main culprits behind those dreaded surface cracks.
Step 6: The Patience Test (Chilling)
Remove the cheesecake from the water bath and allow it to cool completely on a wire rack at room temperature. Once cool, cover the pan tightly with plastic wrap and transfer it to the refrigerator. This cheesecake requires a minimum of 8 hours, but preferably overnight, to chill completely and set properly. Do not rush this step, as slicing a warm cheesecake is culinary sacrilege.
Transfer to plates and drizzle with fresh raspberry sauce and a dusting of cocoa powder for the perfect finishing touch.
Secrets to Achieving a Flawlessly Smooth Cheesecake Top
The journey to creating a picture-perfect cheesecake, one that makes your guests gasp upon presentation, often hinges on small, technical details that are easy to overlook. The most notorious villain in cheesecake baking is the crack that appears across the surface. This structural fault is almost always caused by dramatic temperature shifts or overmixing. To mitigate this, ensure all dairy ingredients, especially the cream cheese and eggs, are at true room temperature. Cold ingredients require more mixing to incorporate, resulting in a batter laden with air bubbles. Those air bubbles expand rapidly in the oven and then collapse upon cooling, causing the surface tension to break.
Furthermore, managing the oven environment is crucial. The water bath, sometimes considered optional, is practically mandatory for a crack-free surface. It introduces steam, which insulates the cake, keeps the internal temperature stable, and ensures even cooking. The slow cooling process outlined in Step 5—leaving the cake in the oven as it cools down—is non-negotiable. Think of it as a decompression chamber for your dessert. If you yank the cheesecake from the 325°F oven directly into a 70°F kitchen, the sudden contraction will create fissures faster than you can say, “More raspberries, please.”
Refining the Raspberry Element for Optimal Flavor
While the chocolate component provides the luxurious depth, the raspberry sauce introduces the essential zing that cuts through the richness, preventing the dessert from becoming too heavy. The quality of the sauce is paramount to this balance. When cooking the sauce, using a thickening agent like cornstarch or agar-agar is necessary to ensure the swirl remains distinct and doesn’t simply weep into the filling, turning the whole thing a muddy pink. When using cornstarch, always create a cold slurry first; dumping dry starch directly into hot liquid creates unappetizing, gummy lumps.
Straining the raspberry puree to remove the seeds is highly recommended. While some people appreciate the rustic texture, a seedless sauce provides a supremely smooth mouthfeel that complements the velvety cheesecake. Once the sauce is strained and thickened, it must be cooled completely before swirling. Introducing warm liquid into the cream cheese filling can prematurely start the cooking process or thin the batter, leading to inconsistencies. If you find yourself in a rush, spread the cooked sauce thinly on a plate and pop it into the freezer for a speedy chill, ensuring it is thick and cool before it meets the creamy filling.
Serving and Storing Your Decadent Creation
After enduring the excruciating wait of the chilling process—which truly tests the resolve of anyone who appreciates fine desserts—the serving phase must be executed with precision. For the cleanest slices, use a sharp, thin knife dipped in hot water and wiped dry between each cut. This technique ensures the dark chocolate crust and the creamy filling separate cleanly, showcasing those beautiful raspberry swirls without smearing.
For storage, this masterpiece keeps remarkably well. Cover the remainder tightly and store it in the refrigerator for up to five days. If you anticipate having leftovers for an extended period, or if you plan on preparing this recipe well in advance of a major celebration, cheesecake freezes wonderfully. Slice the cheesecake first, then wrap each individual slice tightly in plastic wrap followed by a layer of aluminum foil. Frozen slices can last for up to one month. When ready to serve, thaw the slices overnight in the refrigerator, and they will retain their exquisite texture and flavor, ready to help youIndulge in Decadent Dark Chocolate Raspberry Cheesecakeagain and again.
When the calendar hits that point in the year where the days feel too long and your patience has entirely evaporated, you need a culinary hug—and not just any hug. You need the kind of dessert that silences the room upon its arrival. That moment is exactly why you need toIndulge in Decadent Dark Chocolate Raspberry Cheesecake. Forget complicated techniques and stressful oven vigil; this recipe is the reward you earned just by surviving another Tuesday. It’s the ultimate combination of bitter, sweet, and tangy, wrapped up in a creamy, velvety blanket of pure bliss.
My quest for the ultimate cheesecake began after a catastrophic baking failure involving a regular lemon tart that somehow managed to collapse like a sad soufflé attempting a low-altitude jump. I realized that if I was going to invest hours in chilling, mixing, and worrying about a water bath, the results had better be dramatic and life-altering. This cheesecake is my redemption song—a towering achievement that demands respect, yet is surprisingly manageable for even the most humorously clumsy home cook.
This dessert isn’t just a cake; it’s an experience. It’s a bold statement that says, “Yes, I deserve this level of chocolate intensity,” followed immediately by the bright, joyous rebuttal of fresh raspberries. It strikes a balance that prevents the darkness of the chocolate from becoming too overwhelming, allowing the creamy, tangy cheesecake base to shine through brilliantly.
- The intense, bittersweet dark chocolate crust provides a perfect structural foundation and a deep, cocoa richness that complements the filling exquisitely.
- A luxurious, velvety smooth cream cheese filling that achieves peak richness without requiring complex or fussy preparation steps or ingredients.
- The vibrant crimson raspberry swirl offers a tart counterpoint and visually stunning marbling, elevating the dessert’s aesthetic appeal instantly.
- This recipe is adaptable for various occasions, transitioning seamlessly from a sophisticated holiday centerpiece to a casual, impressive weekend dessert.
Ingredients for Indulge in Decadent Dark Chocolate Raspberry Cheesecake
Here’s what you’ll need to make this delicious dish:
- Dark Chocolate Sandwich CookiesThese crushed cookies form the rich, dark base. Ensure they are fully pulverized for a tight, cohesive crust.
- Unsalted ButterEssential for binding the crust together. Melt it gently to ensure proper saturation of the cookie crumbs.
- Cream CheeseUse full-fat brick cream cheese, ensuring it is completely softened to room temperature for a lump-free filling.
- Granulated SugarProvides the necessary sweetness and texture to the creamy filling.
- EggsAct as the primary binding agent. They should also be at room temperature to incorporate seamlessly into the batter without overmixing.
- Vanilla PowderAdds a critical layer of aromatic complexity that enhances the overall flavor profile of the cheesecake base.
- Cocoa Powder (Dutch-Process)Used both in the crust and sometimes lightly dusted on the finished product for an extra layer of dark chocolate intensity.
- Fresh or Frozen RaspberriesCrucial for the vibrant, tangy swirl and sauce. If using frozen, do not thaw them completely before cooking the sauce.
- Cornstarch or Plant-Based PectinUsed to thicken the raspberry sauce, ensuring it holds its shape beautifully when swirled into the filling.
- Lemon JuiceA small amount brightens the flavor of the raspberry sauce, cutting through the richness of the cream cheese.
The full ingredients list, including measurements, is provided in the recipe card directly below.
The Art of the Dark Chocolate Crust
The crust often gets overlooked, but it is the anchor of any excellent cheesecake. For this recipe, we bypass the generic graham cracker route and dive headfirst into the decadence of dark chocolate sandwich cookies. When crushed and mixed with melted butter, they create a dense, deeply flavored foundation that stands up brilliantly to the hefty filling. The key here is uniformity; you want the crumbs to be almost like fine sand, eliminating any large chunks that might cause the crust to crumble when sliced. Pressing the crust firmly into the springform pan, using the bottom of a measuring cup, ensures it maintains integrity throughout the baking and chilling process. Remember, a sloppy crust leads to a structural catastrophe later, and nobody wants their slice of perfection to disintegrate upon serving. The intense flavor of the dark chocolate offers a profound contrast to the sweet cream cheese, making the final dessert far more complex than a standard vanilla variety.
How to Make Indulge in Decadent Dark Chocolate Raspberry Cheesecake
Follow these simple steps to prepare this delicious dish:
Step 1: Constructing the Chocolate Fortress
Preheat your oven to 325°F (160°C). Prepare a 9-inch springform pan by lining the bottom with parchment paper and lightly greasing the sides. In a medium bowl, combine the finely crushed dark chocolate cookies and melted unsalted butter. Press this mixture firmly into the bottom and slightly up the sides of the prepared pan. Bake the crust for 8 to 10 minutes to set it, then remove it from the oven and let it cool completely while you prepare the filling.
Step 2: Preparing the Raspberry Swirl Sauce
While the crust cools, combine the raspberries, a small amount of sugar, and lemon juice in a saucepan. Bring the mixture to a simmer, crushing the berries gently. In a small separate bowl, dissolve a teaspoon of cornstarch (or plant-based pectin) in cold water to create a slurry, then whisk it into the simmering berry mixture. Cook until thickened, about 2 minutes. Strain the sauce through a fine-mesh sieve to remove the seeds, yielding a smooth, intense raspberry reduction. Allow the sauce to cool completely before using it for the swirl.
Step 3: Whipping the Velvety Filling
In a large mixing bowl, beat the softened cream cheese and sugar together on medium speed until the mixture is entirely smooth and fluffy, scraping down the sides often. It is paramount that there are absolutely no lumps remaining. Beat in the vanilla powder. Reduce the mixer speed to low and add the room temperature eggs one at a time, mixing only until just incorporated. Overmixing the eggs introduces too much air, which leads to cracks during baking. This filling must be dense, not airy.
Step 4: Swirling the Masterpiece
Pour about two-thirds of the cream cheese filling over the cooled crust. Drizzle half of the cooled raspberry sauce over the filling. Pour the remaining cream cheese filling on top, followed by the rest of the raspberry sauce. Use a butter knife or skewer to gently create deep swirls, ensuring you drag the knife through all layers without disturbing the crust. Prepare a water bath by wrapping the springform pan tightly in heavy-duty aluminum foil and placing it in a larger baking pan.
Step 5: Baking Low and Slow
Carefully pour hot water into the outer pan until it reaches halfway up the sides of the foil-wrapped springform pan. Bake for 60 to 75 minutes, or until the edges are set and the center still has a slight wobble when gently nudged. Turn off the oven, prop the door open slightly, and leave the cheesecake inside the cooling oven for one hour. This gradual cooling prevents sudden temperature changes, which are the main culprits behind those dreaded surface cracks.
Step 6: The Patience Test (Chilling)
Remove the cheesecake from the water bath and allow it to cool completely on a wire rack at room temperature. Once cool, cover the pan tightly with plastic wrap and transfer it to the refrigerator. This cheesecake requires a minimum of 8 hours, but preferably overnight, to chill completely and set properly. Do not rush this step, as slicing a warm cheesecake is culinary sacrilege.
Transfer to plates and drizzle with fresh raspberry sauce and a dusting of cocoa powder for the perfect finishing touch.
Secrets to Achieving a Flawlessly Smooth Cheesecake Top
The journey to creating a picture-perfect cheesecake, one that makes your guests gasp upon presentation, often hinges on small, technical details that are easy to overlook. The most notorious villain in cheesecake baking is the crack that appears across the surface. This structural fault is almost always caused by dramatic temperature shifts or overmixing. To mitigate this, ensure all dairy ingredients, especially the cream cheese and eggs, are at true room temperature. Cold ingredients require more mixing to incorporate, resulting in a batter laden with air bubbles. Those air bubbles expand rapidly in the oven and then collapse upon cooling, causing the surface tension to break.
Furthermore, managing the oven environment is crucial. The water bath, sometimes considered optional, is practically mandatory for a crack-free surface. It introduces steam, which insulates the cake, keeps the internal temperature stable, and ensures even cooking. The slow cooling process outlined in Step 5—leaving the cake in the oven as it cools down—is non-negotiable. Think of it as a decompression chamber for your dessert. If you yank the cheesecake from the 325°F oven directly into a 70°F kitchen, the sudden contraction will create fissures faster than you can say, “More raspberries, please.”
Refining the Raspberry Element for Optimal Flavor
While the chocolate component provides the luxurious depth, the raspberry sauce introduces the essential zing that cuts through the richness, preventing the dessert from becoming too heavy. The quality of the sauce is paramount to this balance. When cooking the sauce, using a thickening agent like cornstarch or agar-agar is necessary to ensure the swirl remains distinct and doesn’t simply weep into the filling, turning the whole thing a muddy pink. When using cornstarch, always create a cold slurry first; dumping dry starch directly into hot liquid creates unappetizing, gummy lumps.
Straining the raspberry puree to remove the seeds is highly recommended. While some people appreciate the rustic texture, a seedless sauce provides a supremely smooth mouthfeel that complements the velvety cheesecake. Once the sauce is strained and thickened, it must be cooled completely before swirling. Introducing warm liquid into the cream cheese filling can prematurely start the cooking process or thin the batter, leading to inconsistencies. If you find yourself in a rush, spread the cooked sauce thinly on a plate and pop it into the freezer for a speedy chill, ensuring it is thick and cool before it meets the creamy filling. This specific attention to temperature control ensures the beautiful marbling remains vibrant and visually appealing.
Serving and Storing Your Decadent Creation
After enduring the excruciating wait of the chilling process—which truly tests the resolve of anyone who appreciates fine desserts—the serving phase must be executed with precision. For the cleanest slices, use a sharp, thin knife dipped in hot water and wiped dry between each cut. This technique ensures the dark chocolate crust and the creamy filling separate cleanly, showcasing those beautiful raspberry swirls without smearing. The presentation truly elevates the experience when youIndulge in Decadent Dark Chocolate Raspberry Cheesecake.
For storage, this masterpiece keeps remarkably well. Cover the remainder tightly and store it in the refrigerator for up to five days. If you anticipate having leftovers for an extended period, or if you plan on preparing this recipe well in advance of a major celebration, cheesecake freezes wonderfully. Slice the cheesecake first, then wrap each individual slice tightly in plastic wrap followed by a layer of aluminum foil. Frozen slices can last for up to one month. When ready to serve, thaw the slices overnight in the refrigerator, and they will retain their exquisite texture and flavor, ready to help youIndulge in Decadent Dark Chocolate Raspberry Cheesecakeagain and again.
The Accidental Discovery of Sunshine on a Plate

I was trying to use up leftover cocoa powder and a mountain of raspberries before a trip. What started as a chaotic, experimental dump-and-stir session transformed into a slice of pure euphoria. That happy accident led directly to this masterpiece: the perfect way toIndulge in Decadent Dark Chocolate Raspberry Cheesecake.
Life, as we all know, is full of compromises. You compromise on traffic, you compromise on laundry, and sometimes you compromise on dinner. But dessert? Dessert is sacred ground. There should be no compromises whatsoever when it comes to the grand finale of a meal, especially when the craving calls for something deep, dark, and dramatically luxurious. If you are reading this, chances are you, too, have reached that critical stage where only a truly decadent dessert will suffice—one that throws sophistication and comfort together in a beautiful, creamy union. That is precisely where this magnificent dark chocolate raspberry cheesecake enters the chat, wearing a velvet smoking jacket and carrying a tiny, perfect fork.
Before this recipe, my history with cheesecakes was complicated. They cracked. They sunk. They were perpetually pale and needy. I needed a dessert that was robust, self-assured, and utterly foolproof, and I needed it to incorporate the bitterness of high-quality dark chocolate without becoming overwhelmingly rich. The solution, I discovered, wasn’t just in the ingredients, but in the attitude. We aren’t baking a mere cake; we are crafting a moody, majestic dessert experience that pairs the intensity of cocoa with the bright, sassy burst of fresh raspberries. It’s the culinary equivalent of watching a sophisticated French film while eating a massive scoop of ice cream on the couch.
The Quest for the Perfect Chocolate Crust
Every great story needs a solid foundation, and this cheesecake is no exception. We reject the tyranny of the standard graham cracker crust. While lovely for a vanilla cake, it simply lacks the dramatic flair required to support a dark chocolate masterpiece. Instead, we create a deep, espresso-colored base using chocolate wafer cookies, cocoa powder, and a generous amount of melted butter. This crust is the unsung hero, providing a sturdy, slightly bitter counterpoint to the sweet filling.
The preparation is straightforward, demanding only a brief, intense session with your food processor. Pulse those chocolate wafers until they resemble fine, slightly damp dirt—the perfect texture. Add the remaining cocoa powder and sugar, then drizzle in the melted butter. Pressing the crust into the springform pan must be done with intention. Use the flat bottom of a measuring cup to achieve a dense, even layer that extends slightly up the sides. Remember, a well-packed crust means no filling leaks, and no crumbly disappointment when slicing.
Building the Decadent Dark Chocolate Filling
The heart of this creation lies in its filling, which must be perfectly smooth, deeply flavored, and free of lumps. Start with fully softened cream cheese—this is non-negotiable. Cold cream cheese is the nemesis of smooth cheesecake filling. Beat the cream cheese until it looks airy and cloud-like before adding the sugar. Take your time here; patience rewards you with texture.
We use high-quality dark chocolate (at least 70% cocoa solids) melted down to a luxurious, glossy liquid. Folding this into the cream cheese mixture requires a delicate hand. You want the chocolate incorporated, not aggressively beaten into submission. Once the chocolate is married to the cheese, whisk in the eggs one at a time, ensuring each is fully blended before adding the next. Overmixing eggs can introduce too much air, which leads directly to the dreaded crack during cooling. We want sophistication, not geological instability.
Perfecting the Cooking Process
For best results, prepare the crust first and chill it while you mix the filling. Crucially, bake the cheesecake in a water bath to prevent cracking, then turn off the oven and leave it inside for an hour. This slow cooling is the secret to creamy perfection.
The Secret of the Water Bath (Bain-Marie)
If the concept of wrapping your springform pan in aluminum foil and setting it afloat in a pool of hot water sounds dramatic, that’s because it is. The water bath, or bain-marie, is the essential trick of the trade. It ensures that the cheesecake bakes slowly and gently, keeping the edges from setting too fast before the center cooks. This consistent, humid heat guarantees that velvety, custardy interior we crave. Wrap your pan tightly—I usually use two layers of heavy-duty foil—to ensure no water sneaks into the crust. The foil-wrapped cheesecake sits in a larger roasting pan, and boiling water is poured into the roasting pan until it reaches halfway up the side of the springform pan.
The Grand Finale: Raspberry Topping and Cooling
Baking time varies, but generally, the cheesecake is done when the edges look set and the center wobbles slightly, like firm carrageenan. The biggest mistake amateur bakers make is pulling the cheesecake out immediately. Don’t do it! Turn the oven off, prop the door open slightly, and let the cheesecake cool inside for a full hour. This gradual transition prevents the sudden temperature shock that causes those massive, unsightly cracks. After the hour, remove it from the water bath and cool it completely on a wire rack before transferring it, uncovered, to the refrigerator for at least eight hours. Cheesecake requires commitment, but the reward is worth the wait.
The raspberry topping is the final touch of brilliance, providing the essential tartness to cut through the richness of the dark chocolate. You can choose a simple fresh raspberry layer, tossed lightly with a spoonful of sugar and lemon juice, or create a quick raspberry reduction using plant-based gelling agents like pectin or agar-agar if you prefer a thicker glaze. Either way, reserve the topping application until just before serving. The contrast between the intense chocolate filling and the vibrant red fruit is what makes this dessert unforgettable.
Add Your Touch
If you prefer a tangier note, substitute a third of the cream cheese with mascarpone. For an intense crunch, mix toasted chopped pecans into the chocolate crust. A dash of high-quality vanilla powder or a sprinkle of orange zest can elevate the complexity of the dark chocolate flavor.
- To avoid a grainy filling, ensure your cream cheese is fully softened to room temperature before mixing; cold cheese causes lumps that baking won’t fix.
- When melting the dark chocolate, use a double boiler or microwave in short 20-second bursts to prevent scorching, ensuring it stays smooth and glossy.
- Never skip the water bath (bain-marie); it insulates the sides of the cake, guaranteeing even cooking and a beautifully flat, uncracked top surface.
My grandmother, who critiques everything, tried this recipe and immediately demanded a second slice. That was the moment I knew this recipe had officially crossed the line from good to legendary status.
Storing & Reheating
Store this rich dessert tightly covered in the refrigerator for up to five days. Since it’s a baked dessert, reheating is not necessary or recommended. For the best flavor and texture, serve it chilled, letting it sit at room temperature for just 15 minutes before slicing.
Conclusion for Indulge in Decadent Dark Chocolate Raspberry Cheesecake
This dessert is more than just a cheesecake; it’s an experience. We started with the simple desire for deep, satisfying chocolate and layered it with the vibrant sharpness of fresh raspberries. By following the crucial steps—especially the slow cooling process—you guarantee a silky, flawless texture every time. Whether you’re celebrating a major milestone or simply want to transform a Tuesday night, this is the dessert that delivers pure joy. Now go ahead, preheat that oven, and prepare toIndulge in Decadent Dark Chocolate Raspberry Cheesecake. Your dessert destiny awaits.
PrintIndulge in Decadent Dark Chocolate Raspberry Cheesecake
Achieve ultra-smooth perfection! This intense dark chocolate cheesecake uses a secure water bath bake for a velvety texture. Master the Oreo crust and rich cream cheese filling.
- Prep Time: 15 minutes
- Cook Time: 20 minutes
- Total Time: 35 minutes
- Yield: 4 servings 1x
- Method: Stovetop
- Cuisine: American
Ingredients
- 1 ½ cups chocolate sandwich cookie crumbs (e.g., Oreo)
- ¼ cup unsalted butter, melted
- 32 oz (4 packages) full-fat cream cheese, softened
- 1 cup granulated sugar
- 4 large eggs, room temperature
- 8 oz quality dark chocolate (60-70% cocoa), melted
- 1 teaspoon pure alcohol-free vanilla extract
- ½ cup fresh or frozen raspberries, pureed
Instructions
- Step 1: Preheat the oven to 325°F (160°C). Prepare the crust by combining cookie crumbs and melted butter. Press the mixture firmly into the bottom and slightly up the sides of a 9-inch springform pan, then wrap the bottom of the pan securely in heavy-duty aluminum foil to prepare for a water bath.
- Step 2: Prepare the filling by beating the softened cream cheese and granulated sugar in a large bowl until smooth. Mix in the vanilla bean paste and the cooled, melted dark chocolate until fully incorporated. Gently beat in the eggs one at a time, mixing only until just combined to avoid incorporating too much air.
- Step 3: Pour the chocolate cheesecake filling over the prepared crust. Drizzle the raspberry puree over the top of the filling, then use a knife or skewer to gently swirl the raspberry into the chocolate mixture to create a marbled effect.
- Step 4: Place the foil-wrapped springform pan into a large roasting pan. Carefully pour hot water into the roasting pan until it reaches halfway up the side of the cheesecake pan (the water bath). Bake for 65–75 minutes, or until the edges are set and the center slightly jiggles when gently nudged.
- Step 5: Turn off the oven, crack the door open slightly, and allow the cheesecake to cool slowly within the water bath for 1 hour. Remove the cheesecake from the water bath, cool completely on a wire rack, and then refrigerate for a minimum of 6 hours, preferably overnight, before releasing from the springform pan and serving.
Notes
- For optimal flavor and structural integrity, store leftover cheesecake securely wrapped in the refrigerator for up to five days, or freeze well-wrapped slices and thaw them overnight in the fridge before serving.
- Never attempt to reheat this baked cheesecake; instead, pull it from the fridge 30–45 minutes before slicing so the rich dark chocolate and cream cheese can temper slightly for a smoother mouthfeel.
- Elevate this dessert by serving chilled slices alongside a fresh dollop of lightly sweetened crème fraîche or a scattering of fresh raspberries tossed lightly with sugar.
- To guarantee a perfectly creamy texture and prevent cracks, ensure both your cream cheese and eggs are fully at room temperature, and strictly adhere to the crucial slow cooling process outlined in Step 5.
Nutrition
- Serving Size: 1 slice (1/14th of 9-inch cake)
- Calories: 420
- Sodium: 110mg
- Fat: 27g
- Saturated Fat: 16g
- Unsaturated Fat: *Note: The FDA does not require %DV listed for Trans Fat, Unsaturated Fat, or Protein on standard labels, unless a specific claim is made.
- Trans Fat: 0g
- Protein: 30g

Leave a Comment