
The aroma of classic cinnamon rolls is comforting, but let’s be honest, sometimes you crave drama, flair, and a magnificent crimson hue. Forget the basic breakfast bun; we are diving headfirst into indulgence withThe Best Red Velvet Cinnamon Rollsyou will ever create. These majestic, cocoa-infused swirls, slathered in tangy cream cheese frosting, represent peak baking performance, demanding attention wherever they are served. Prepare yourself for compliments, requests for the recipe, and possibly mild obsession.
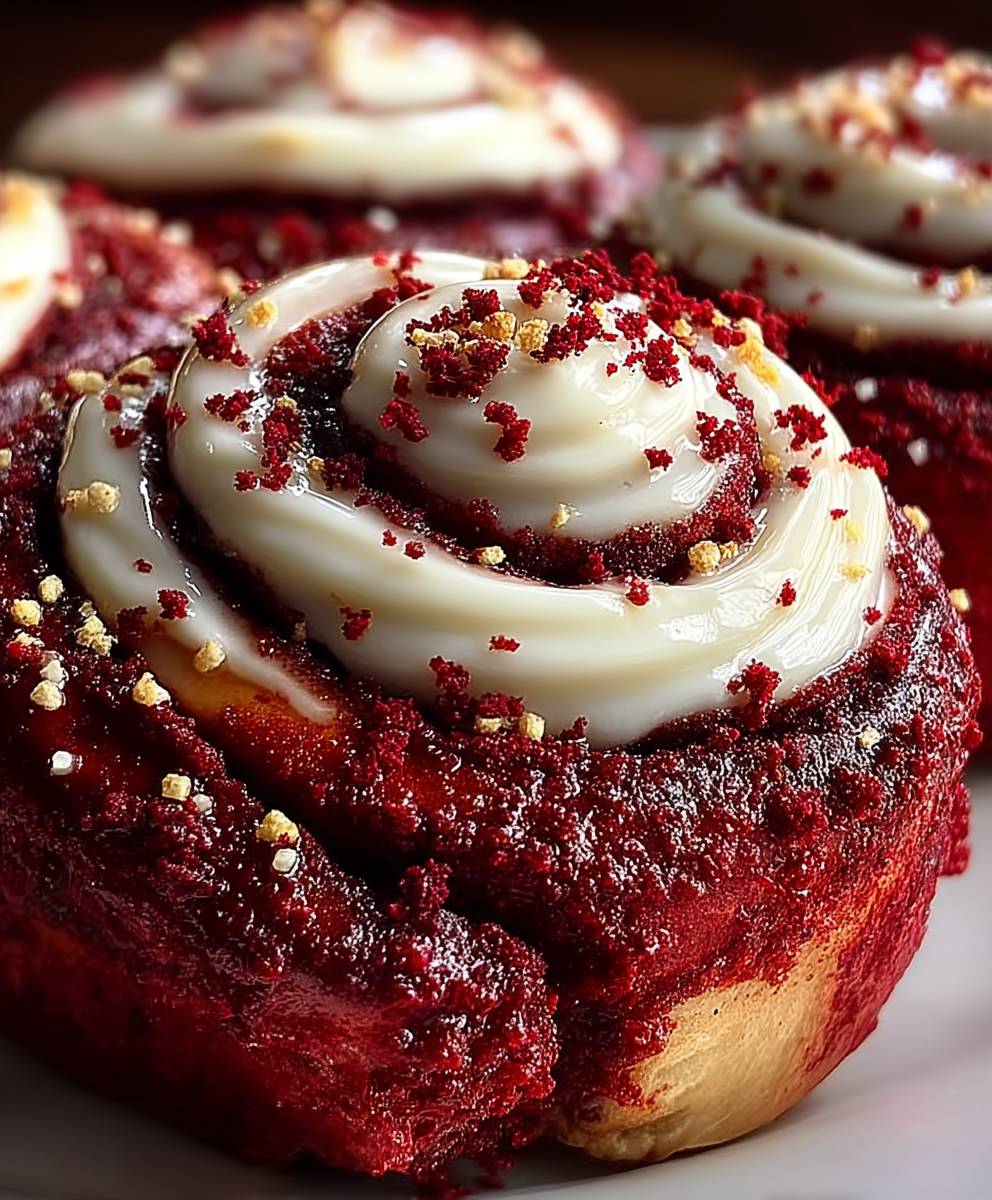
- These rolls offer a beautiful contrast of deep crimson dough and bright white frosting, ensuring a stunning presentation every single time.
- The unique flavor profile blends subtle cocoa notes with signature tanginess and sweet cinnamon spice for true complexity.
- Preparation is surprisingly approachable, requiring standard kitchen equipment and yielding bakery-quality results effortlessly.
- They are versatile enough for brunch, dessert, or a spectacular holiday treat, adaptable to various schedules and serving needs.
The Pursuit of the Perfect Velvet Swirl
I spent years believing that regular cinnamon rolls were the pinnacle of baked goods. They were gooey, sweet, and reliably delicious. Then, I met Red Velvet. It was like trading a cozy sweater for a full-length, sequined evening gown. The aesthetic upgrade was undeniable, but capturing that iconic flavor—the slight cocoa bitterness paired with that crucial tang—in a yeast dough proved surprisingly challenging. Most attempts resulted in rolls that were either too dense, lacking the vibrant color, or tasting suspiciously like food coloring and utter disappointment.
After months of rigorous experimentation, involving various amounts of buttermilk, vinegar, and high-quality cocoa powder (and suffering through many batches that looked tragically like sad, brown lumps), I finally cracked the code. This recipe forThe Best Red Velvet Cinnamon Rollsbalances the necessary structural integrity of a yeast roll with the delicate crumb and iconic flavor profile of classic red velvet cake. The true secret lies in a careful addition of acid and high-quality cocoa, ensuring that rich, dark crimson color develops beautifully without compromising the essential light and fluffy texture.
When you pull these warm, glistening crimson swirls from the oven, they possess a specific gravitational pull. People simply stop talking and stare. This isn’t just baking; it is an event, a performance piece in pastry form. Whether you are aiming to impress your in-laws, win the neighborhood bake-off, or simply want an unparalleled Sunday morning treat, this method guarantees success. Just make sure you hide a few for yourself before the inevitable stampede begins. Consider that a vital piece of survival advice.
Mastering the Signature Velvet Dough
The foundation of any truly great cinnamon roll is, naturally, the dough. For the red velvet adaptation, we need a dough that is simultaneously rich, deeply colored, and incredibly light. Start by ensuring your milk is perfectly warm—it should feel exactly like a warm bath, not a boiling cauldron—to properly activate the yeast. Combining the yeast with a little sugar and milk encourages rapid proofing, essentially waking up our little leavening friends and giving them a pep talk. Once you observe a nice layer of foam developing, you know the process is off to a stellar start and your rolls are destined for loftiness.
The characteristic red color comes from a potent combination of high-quality red food gel (liquid coloring will introduce too much moisture and ruin the texture) and the chemical reaction between the acid, provided by the buttermilk and vinegar, and the cocoa powder. Do not skimp on the quality of your cocoa here; a good Dutch-processed cocoa provides the rich depth necessary to counteract the sweetness. Mixing the dry ingredients thoroughly before incorporating the wet ensures even distribution of that crucial red color and all the necessary leavening agents. Finally, kneading is mandatory here; you are developing gluten, which traps the carbon dioxide bubbles created by the yeast, resulting in that pillowy-soft interior crumb we all adore. Aim for a smooth, elastic ball of dough that springs back slightly when gently poked. Give the dough the required time to rise in a warm, draft-free spot; patience, it turns out, is the highly unsung ingredient in superior, transcendent baking.
Ingredients for The Best Red Velvet Cinnamon Rolls
Here’s what you’ll need to make this delicious dish:
- All-Purpose FlourUse a reliable brand for consistent results; it provides the main structure for the soft, airy rolls you are aiming for.
- Granulated SugarThis essential ingredient feeds the yeast and provides necessary, balanced sweetness throughout the dough and the final bake.
- Instant YeastEnsures a strong, reliable rise and helps create the remarkably fluffy texture inherent in truly great cinnamon rolls.
- Unsalted ButterProvides richness and essential moisture to the dough, filling, and frosting; make sure it is softened for easy incorporation into the dough.
- Buttermilk and Apple Cider VinegarThese are the crucial acidic components that react chemically with the cocoa to deepen the red hue and add that subtle, signature tang.
- High-Quality Red Food GelThis is necessary for achieving that magnificent, deep crimson color without altering the delicate dough consistency with excess liquid.
- Unsweetened Cocoa PowderProvides the subtle yet unmistakable chocolate flavor that truly defines the red velvet profile and interacts with the acid.
- Brown Sugar and CinnamonUsed for the irresistible, gooey filling; packed brown sugar delivers the necessary molasses flavor and deep moisture retention.
- Cream CheeseThe essential base for the luxurious, tangy frosting; use full-fat, brick-style cream cheese for the best flavor and sturdy texture.
- Powdered Sugar and Vanilla PowderUsed to rapidly sweeten and beautifully flavor the signature cream cheese glaze that crownsThe Best Red Velvet Cinnamon Rolls.
The full ingredients list, including measurements, is provided in the recipe card directly below.
How to Make The Best Red Velvet Cinnamon Rolls
Follow these simple steps to prepare this delicious dish:
-
Activate the Yeast and Mix Wet Ingredients
In a large bowl, combine the warm milk, a pinch of granulated sugar, and the instant yeast. Let this mixture stand undisturbed for about five to ten minutes until it becomes noticeably foamy, indicating active yeast. In a separate bowl, whisk together the buttermilk, melted butter, apple cider vinegar, red food gel, and vanilla powder until the color is consistent, vivid, and deeply crimson. This is the initial moment where the dough begins its glorious color transformation.
-
Form and Knead the Red Velvet Dough
In a stand mixer fitted with a dough hook (or a very large mixing bowl), combine the flour, remaining sugar, cocoa powder, and salt. Gradually pour in the vivid wet red mixture and mix initially on low speed until a shaggy dough forms. Increase the speed slightly and continue kneading for eight to ten minutes until the dough is perfectly smooth, wonderfully elastic, and pulls cleanly away from the sides of the bowl. Place the dough in a lightly oiled bowl, turn to coat, cover tightly with plastic wrap, and let it rise in a warm place for 60 to 90 minutes, or until the mass has fully doubled in size.
-
Fill and Slice the Crimson Swirls
Once doubled, gently punch the air out of the dough and roll it out onto a lightly floured surface into a large, uniform rectangle, aiming for dimensions roughly 18 by 12 inches. Spread the softened butter evenly over the dough, extending the coating almost to the very edges. In a small bowl, thoroughly combine the brown sugar and cinnamon, then sprinkle this generous, fragrant mixture evenly over the butter layer. Starting from the long edge, tightly roll the dough into a firm cylinder. Use unscented dental floss or a very sharp knife to slice the roll into 12 even pieces, approximately 1.5 inches thick.
-
Second Proof and Baking
Arrange the sliced rolls, cut-side up, in a lightly greased 9×13 inch baking dish, ensuring you leave a small gap between each roll—they need adequate room to grow into each other during the final rise. Cover the dish loosely and allow the rolls to proof again for 30 to 45 minutes, or until they look noticeably puffy and nestled close together. Preheat your oven to 375°F (190°C). Bake for 20 to 25 minutes, or until the edges are lightly golden brown and the centers are fully cooked but remain beautifully soft. They should fill your entire home with an absolutely heavenly aroma.
Transfer to plates and drizzle with sauce for the perfect finishing touch.
Crafting the Cream Cheese Cloud
The perfect roll inherently demands the perfect frosting. For these chocolate-infused buns, anything less than a tangy, smooth, and robust cream cheese frosting is nothing short of a tragedy. This is where the visual and flavor contrast truly shines; the cool, bright white glaze against the rich, warm red dough is visual and gustatory poetry. Start this process by ensuring your cream cheese and butter are thoroughly softened to room temperature. If they are cold, you will undoubtedly end up with a lumpy, frustrating mess; we are aiming for airy clouds of sweetness, not dense, grainy pebbles.
Use a high-powered hand mixer or a stand mixer to beat the cream cheese and butter together until they are remarkably light, totally smooth, and irresistibly fluffy. This intensive beating step incorporates crucial air, making the finished frosting wonderfully airy and easy to spread. Gradually beat in the powdered sugar, ensuring it is incorporated slowly to avoid a sudden, catastrophic eruption of white sugar dust all over your pristine kitchen (a common but preventable domestic hazard). Finish the mixture with a generous splash of pure vanilla powder and, if the resulting frosting seems slightly too thick for drizzling, a tiny splash of milk or even a tablespoon of buttermilk will loosen it up nicely. You want a final consistency that is thick enough to hold its lovely shape but fluid enough to melt beautifully and seamlessly into the warm crevices of these outstanding velvet rolls.
Tips for Achieving Bakery-Worthy Results
BakingThe Best Red Velvet Cinnamon Rollsis ultimately more about precise technique than utilizing complex or exotic ingredients. A few crucial tips reliably separate the merely good rolls from the truly spectacular ones, ensuring you achieve that professional bakery quality every time you attempt the recipe. Firstly, understand that humidity severely affects dough consistency. If your dough feels overly sticky after the full kneading time, resist the immediate, powerful urge to add excess flour. Too much flour results in disappointingly dry, heavy rolls that lack that signature airy quality. Instead, lightly flour your hands and work surface and rely on the prolonged, deliberate kneading process to properly develop the necessary elasticity. Remember, the dough should still be slightly tacky to the touch, which indicates good moisture retention, but it absolutely must be manageable to handle.
Secondly, consistent temperature control is absolutely paramount for effective yeast activity and a beautiful, lofted rise. Yeast thrives reliably in warmth, and warmth significantly speeds up the crucial fermentation process. If your kitchen happens to be cold—perhaps you live in a perpetually chilly climate or have highly aggressive air conditioning—you need to intentionally create a cozy, proofing haven for your dough. A clever and effective trick is to turn your oven on low (around 170°F or 75°C) for just a couple of minutes to heat the air, then turn it off completely and immediately place the covered dough bowl inside. This gentle residual heat provides the ideal environment for the perfect rise. When applying the frosting, ensure the rolls are fully cooled if you prefer a cleaner, more defined look, but for true, unparalleled gooey decadence, frost them immediately while they are still piping hot. That glorious melted frosting seeps right into the hot gaps, creating a superior texture that is totally irresistible.
Finally, when rolling the dough after spreading the irresistible filling, roll it as tightly as humanly possible without actually tearing the dough. A tight, uniform roll is absolutely essential because it guarantees that the individual swirls remain defined, prevents them from awkwardly unraveling, and stops them from puffing out sideways during the baking process. If the cylinder is rolled loosely, the rolls will inevitably bake into flat, messy ovals that lack aesthetic appeal. Take deliberate care during the rolling and subsequent slicing phase; this dedication to precision pays enormous dividends in the final stunning presentation and superior texture.
Storage and Reheating Secrets
If, by some miracle of willpower or sheer quantity, you find yourself with leftover crimson swirls, proper storage is unequivocally key to preserving their glory and fantastic texture. Once cooled and lavishly frosted, store these perfect rolls in an airtight container at room temperature for up to two days, maintaining their softness. For slightly longer storage, you can refrigerate them for up to five days. If you plan for deep future consumption, the best method is to freeze them before applying the frosting. Place the baked, fully cooled rolls in a large freezer-safe bag or container; they keep wonderfully well for up to three months without any degradation in flavor.
Reheating is simple and utterly crucial for reviving that fresh-baked aroma and soft, yielding texture. Pop a single roll into the microwave for just 15 to 30 seconds for a quick treat, or for the superior method, wrap one loosely in foil and reheat it in a 350°F (175°C) oven for about 10 minutes. The oven method reliably maintains the soft, tender texture best, actively preventing the delicate dough from becoming rubbery or dry. If you froze them unfrosted, simply thaw them overnight in the refrigerator, reheat as directed, and then apply a fresh batch of the magnificent cream cheese cloud before serving. Sharing these delightful velvet rolls is always optional, but highly recommended, if only to permanently solidify your reputation as a certified baking legend.
The commitment required to produce these velvety masterpieces is honestly minimal compared to the awe and silence they instantly inspire. These are not just standard breakfast items; they are a profound culinary statement of dedication and flavor mastery. Prepare yourself to fully bask in the glory of the finest, most dramatically beautiful cinnamon rolls you have ever tasted.
Welcome, fellow carb enthusiasts, to the recipe that accidentally turned my kitchen into a decadent bakery and almost bankrupted me in food coloring costs. If you thought a regular cinnamon roll was the pinnacle of breakfast indulgence, allow me to introduce you to its wildly glamorous, slightly dramatic cousin: the Red Velvet Cinnamon Roll. These aren’t your average sticky buns; they are fluffy, subtly cocoa-laced swirls of crimson dough, generously coated in a tangy, cloud-like cream cheese frosting. Prepare yourself, because once you taste these, every other cinnamon roll will seem terribly bland.
I usually bake on autopilot, often wearing mismatched socks and singing dramatically off-key. But the morning I devised this particular recipe was different. I was trying to combine the dense, comforting texture of a classic roll with the sophisticated flavor profile of a red velvet cake—a seemingly impossible feat. Many failed attempts resulted in rolls that looked suspiciously pink and tasted like disappointment, but I persevered. The secret, I found, was balancing the acidity of the vinegar (essential for that classic red velvet tang) with the richness of the cocoa and the tenderizing effect of buttermilk (or a non-dairy substitute). The resulting dough achieves a shocking, beautiful red hue and bakes up into a pastry so soft, it practically melts upon contact with the frosting.
Forget the store-bought mixes and the overly sweet, artificially flavored variations. We are embarking on a journey toward truly indulgent, scratch-made baked perfection. This recipe requires patience, mostly during the rising phases, but the actual hands-on work is surprisingly straightforward. Think of the waiting time as mandated coffee breaks. You deserve them, especially since you are about to create The Best Red Velvet Cinnamon Rolls the world has ever seen.
The Accidental Discovery of Sunshine on a Plate

I was aiming for a simple batch of regular cinnamon rolls, but spilled cocoa powder near the red food coloring. The resulting chaos led to this shockingly beautiful, slightly chocolatey masterpiece. That day, my kitchen smelled like triumph and holiday cheer, and The Best Red Velvet Cinnamon Rolls were born.
The Anatomy of a Perfect Roll
Creating these velvet swirls requires attention to three distinct components: the impossibly tender crimson dough, the spicy, gooey cinnamon filling, and the luxurious, tangy cream cheese frosting. Getting the dough right is paramount. Yeast needs warmth and patience. If you rush the rising process, you end up with dense, heavy disks instead of the light, airy pastry we crave. Always use high-quality, unsweetened cocoa powder; it provides the deep flavor and crucial acidity without overwhelming the yeast.
Ingredients for the Ruby Swirls
- 2 1/4 teaspoons active dry yeast
- 1 cup warm milk (dairy or non-dairy equivalent), about 105°F to 115°F
- 1/2 cup granulated sugar
- 1/2 cup unsalted butter, melted (or plant-based butter substitute)
- 2 large eggs
- 1 teaspoon white distilled vinegar
- 1 teaspoon vanilla powder
- 1/4 cup unsweetened cocoa powder
- 2 tablespoons red gel food coloring (essential for deep color)
- 4 1/2 cups all-purpose flour, plus more for dusting
- 1 teaspoon salt
The Gooey Cinnamon Filling
- 1 cup light brown sugar, packed
- 2 tablespoons ground cinnamon
- 1/2 cup unsalted butter, softened
Cloud-Like Cream Cheese Frosting
- 4 ounces cream cheese, softened (or plant-based cream cheese)
- 1/2 cup unsalted butter, softened
- 3 cups powdered sugar, sifted
- 1 teaspoon vanilla powder
- 2 tablespoons milk (or non-dairy equivalent), optional, for consistency
The Art of Dough Development
Start by dissolving the yeast and a tablespoon of sugar in the warm milk. Give it five minutes to bloom—you should see a pleasant froth forming. While that’s working, in a separate bowl, whisk together the melted butter, remaining sugar, eggs, vanilla, and vinegar. This acidic element reacts beautifully with the cocoa to create the signature red velvet flavor. Now, mix in the cocoa powder and the vibrant red food coloring until the liquid mixture achieves a shocking, uniform crimson.
Combine the liquid mixture with the yeast mixture. Slowly incorporate the flour and salt. Mix until a shaggy dough forms, then turn it out onto a lightly floured surface. Knead the dough for about 8 to 10 minutes until it is smooth, elastic, and slightly tacky. Place the dough in a greased bowl, cover it with plastic wrap, and let it rise in a warm spot until it has doubled in size, usually between 60 and 90 minutes. This slow rise is critical for developing complex flavors and the softest texture.
Once risen, punch the dough down gently to release the air. Roll it out into a large rectangle, roughly 12 by 18 inches. Ensure the thickness is consistent across the sheet. Now, prepare the filling. Cream together the softened butter, brown sugar, and cinnamon until you have a smooth paste. Spread this mixture evenly over the entire surface of the dough, leaving a small, half-inch border along the farthest edge.
Tightly roll the dough along the long edge. A tight roll is the key to creating those beautiful, spiral layers. Pinch the seam closed firmly. Using dental floss or a very sharp, un-serrated knife, slice the log into 12 equally sized rolls. Place these swirls into a lightly greased 9×13-inch baking pan, ensuring they have about half an inch of space between them. Cover the pan and let them rise again for a final 30 to 45 minutes—this is the second proofing, which gives them their ultimate cloud-like lift.
Perfecting the Cooking Process
Start by warming the milk slightly to activate the yeast properly; this is key for a fluffy dough. While the dough rests for its first rise, prepare the cream cheese frosting and the cinnamon filling mixture. Roll, slice, and then bake immediately to ensure maximum puffiness and deep red color intensity.
Preheat your oven to 350°F (175°C). Bake the crimson rolls for 20 to 25 minutes. They should be lightly golden brown on the edges and beautifully cooked through, but still soft in the center. While the rolls cool slightly, prepare the cream cheese frosting. In a large bowl, beat the softened cream cheese and butter until smooth and lump-free. Gradually add the powdered sugar, mixing on low speed, then incorporate the vanilla powder. Add a tablespoon or two of milk if you prefer a thinner, drizzly consistency, but I prefer mine thick enough to spread with a trowel. Frost the rolls generously while they are still warm, allowing the heat to slightly melt the edges of the frosting, letting it seep into every glorious crevice.
Add Your Touch
For extra richness, swap out some plain flour for pastry flour. If you want a citrus hint in the frosting, add a teaspoon of lemon or orange juice. Instead of typical cinnamon, try incorporating cardamom for a warmer, exotic twist that complements the subtle cocoa notes beautifully.
These rolls are inherently dramatic, but that doesn’t mean you can’t enhance their appeal. Try sprinkling a dash of cocoa powder or finely chopped pecans over the top of the frosting for texture contrast. For a truly intense velvet experience, you could also mix a tiny amount of red food coloring into the cream cheese frosting, though the contrast of the bright white against the crimson roll is often the most visually stunning choice. Remember, the base recipe for these fantastic red velvet pastries is flawless, so any modification you make is just a fun detour on the road to decadence.
- Always use gel food coloring, not liquid. Liquid coloring adds too much moisture, potentially ruining the soft, tender texture of your dough.
- Don’t over-flour your surface when rolling out the dough. Too much extra flour makes the final roll tough and chewy, defeating the purpose of a gooey treat.
- Slice the dough using unscented dental floss instead of a knife. This prevents squishing the rolls and helps maintain their perfectly round, gorgeous shape before baking.
My niece once claimed these tasted like Year-End Celebration morning wrapped in a hug. Ever since, I know they are ready when they have that perfect crimson blush and the aroma makes my neighbors knock on the door asking for samples.
Storing & Reheating
Store un-frosted rolls tightly covered at room temperature for up to two days, or freeze baked rolls for up to three months. To reheat, wrap rolls in foil and bake at 300°F (150°C) for 10 minutes. For refrigerated rolls, warm them gently in the microwave for a few seconds.
If you have already frosted the rolls, refrigeration is necessary if you intend to keep them longer than one day, due to the cream cheese. Store them in an airtight container in the refrigerator for up to five days. When reheating frosted rolls, avoid the oven, as it can dry out the frosting. Instead, remove the desired portion, let it come to room temperature for 30 minutes, and then lightly warm it in the microwave using very short bursts (5 to 10 seconds) until just warmed through.
Conclusion for The Best Red Velvet Cinnamon Rolls
These Red Velvet Cinnamon Rolls are more than just a dessert; they are a decadent experience designed to impress. We blended the delicate tang of red velvet cake with the comfort of a classic sticky bun, resulting in a show-stopping treat. Remember the keys to success: tender dough, rich cocoa, and a generous slathering of that creamy, tangy frosting. Whether you bake them for a holiday brunch or a spontaneous Sunday morning indulgence, they promise an unparalleled joy. Go ahead, dive into the crimson swirl and discover why these truly are The Best Red Velvet Cinnamon Rolls you will ever make.
PrintThe Best Red Velvet Cinnamon Rolls

Experience the ultimate hybrid! These Red Velvet Cinnamon Rolls feature a fluffy, deep-red cocoa dough and a classic buttery cinnamon swirl. Proofed perfectly for 90 minutes.
- Prep Time: 15 minutes
- Cook Time: 20 minutes
- Total Time: 35 minutes
- Yield: 4 servings
- Method: Stovetop
- Cuisine: American
Ingredients
- All-purpose flour: 3 cups (plus more for dusting)
- Active dry yeast: 2 1/4 teaspoons
- Whole milk (warmed to 110°F): 1 cup
- Granulated sugar: 1/4 cup (plus 1/2 cup for the filling)
- Unsalted butter (melted and cooled): 1/4 cup
- Unsweetened cocoa powder: 1/4 cup
- Red liquid food coloring (or 2 tsp gel coloring): 2 tablespoons
- Cream cheese (softened): 4 ounces
Instructions
- Step 1: Activate the yeast and prepare the dough. In a large bowl, whisk the warm milk, melted butter, and yeast. Let sit for 5 minutes until foamy. Stir in 1/4 cup sugar, the cocoa powder, and the red food coloring. Gradually add the flour until a cohesive, shaggy dough forms. Knead on a floured surface for 5-7 minutes until smooth. Place the dough in a greased bowl, cover, and let rise in a warm spot for 1 to 1.5 hours, or until doubled in size.
- Step 2: Shape the rolls and prepare the filling. Punch down the risen dough and roll it out onto a lightly floured surface into a 12×18 inch rectangle. For the filling, spread 4 tablespoons of softened butter evenly over the dough. Combine the remaining 1/2 cup sugar with 2 teaspoons of ground cinnamon and sprinkle evenly over the buttered dough.
- Step 3: Roll, slice, and perform the second rise. Starting with the long end, tightly roll the dough into a log. Using a sharp knife or dental floss, slice the log into 12 equal pieces. Arrange the rolls cut-side up in a greased 9×13 inch baking dish. Cover lightly and let rest for a second proof for 30 minutes while preheating the oven to 375°F (190°C).
- Step 4: Bake the cinnamon rolls. Bake the rolls for 20-25 minutes, or until the edges are golden brown and the centers are fully puffed. While the rolls are baking, prepare the frosting by beating together the softened cream cheese, 1/4 cup of softened butter, 2 cups of powdered sugar, and 1 teaspoon of vanilla until light and fluffy.
- Step 5: Frost and serve. Remove the cinnamon rolls from the oven and allow them to cool in the pan for 5-10 minutes. Generously spread the cream cheese frosting over the warm red velvet cinnamon rolls and serve immediately.
Notes
- If you have leftovers, store the frosted rolls in an airtight container in the refrigerator and bring them to room temperature before serving for the best texture.
- Stale rolls can be wonderfully revived by wrapping them loosely in foil and heating them in a 300°F oven for about 10 minutes until gooey and soft again.
- For the ultimate treat, serve these warm rolls alongside a scoop of vanilla bean ice cream to balance the rich red velvet and tangy cream cheese frosting.
- For a perfectly clean slice that keeps the spiral intact, use unflavored dental floss instead of a knife to cut the rolled log; just slide it under, cross the ends, and pull.
Nutrition
- Serving Size: 1 large cinnamon roll
- Calories: 585
- Sodium: 410mg
- Fat: 33g
- Saturated Fat: 19g
- Trans Fat: 0g
- Protein: 47g


Leave a Comment