
There’s a specific kind of silence that falls over a room when someone takes the first bite of this creamy marvel—followed immediately by an involuntary groan of pure satisfaction. My dessert obsession has peaked, and I’m ready to share the glorious secret ingredient combination.
If you’ve ever wondered what makes that dreamy dessert so addictive, we are diving deep into the essentialBiscoff Cheesecake Ingredients: A Complete Guide to Making the Perfect Dessertthat transforms simple ingredients into caramelized bliss.
- Effortlessly prepare this no bake masterpiece requiring minimal active cooking time and basic kitchen equipment perfect for beginners.
- Experience the unparalleled flavor profile of deeply spiced cookies blended beautifully with rich, tangy cream cheese filling.
- The stunning visual appeal features a dramatic, thick crust and a generous swirl of cookie butter topping making it camera ready.
- This versatile dessert is ideal for elegant dinner parties, casual gatherings, or simply elevating a Tuesday evening into something special.
Biscoff Cheesecake Ingredients: A Complete Guide to Making the Perfect Dessert
Here’s what you’ll need to make this delicious dish:
- Cream CheeseUse full fat, brick-style cream cheese and ensure it is completely softened to room temperature for a smooth, lump-free filling.
- Cookie SpreadThis is the secret weapon, providing that distinct caramelized ginger flavor; use the smooth variety for the best incorporation into the batter and swirl.
- Heavy CreamChilled heavy whipping cream is essential for whipping into stiff peaks, giving the cheesecake its necessary airy volume and structure.
- Powdered Sugar (Confectioners’ Sugar)Unlike granulated sugar, powdered sugar dissolves easily into the cream cheese mixture, ensuring a silken texture without graininess.
- Vanilla Bean PasteUse high quality pure vanilla bean paste to enhance the sweetness and balance the bold spice notes of the cookies.
- Cookie BiscuitsThese spiced cookies form the foundational crust; crush them finely in a food processor until they resemble coarse sand.
- Unsalted ButterMelted butter binds the crust together; using unsalted allows you to control the overall salinity of the dessert.
- Plant-Based Gelling Agent (Agar-Agar or Pectin)A small amount is necessary to stabilize the no-bake filling, ensuring the cheesecake holds its shape beautifully once chilled.
The full ingredients list, including measurements, is provided in the recipe card directly below.
How to Make Biscoff Cheesecake: Building Caramelized Perfection
Follow these simple steps to prepare this delicious dish:
Step 1: Preparing the Crust Foundation
Crush about 9 ounces of the spiced cookies until you have fine crumbs. You can achieve this using a food processor or by placing them in a sealed plastic bag and crushing them with a rolling pin—a great stress reliever, incidentally. Once crushed, combine the crumbs with 6 tablespoons of melted unsalted butter. Press this mixture firmly and evenly into the base and slightly up the sides of a 9-inch springform pan, chilling it in the freezer while you prepare the filling.
Step 2: Whipping the Cream Stabilizer
In a large, chilled mixing bowl, whip 1.5 cups of heavy cream until stiff peaks form. The peaks should hold their shape when you lift the whisk. Be careful not to over-whip, which can result in a grainy texture. Once whipped, set this aside in the refrigerator, as it is crucial for creating the light and fluffy structure of the cheesecake.
Step 3: Creating the Cream Cheese Base
Beat 16 ounces of fully softened cream cheese in a separate bowl until it is light and fluffy, scraping down the sides often. Add 1 cup of powdered sugar, 1 teaspoon of vanilla bean paste, and 1/4 cup of the smooth cookie spread. Continue beating on medium speed until the mixture is perfectly smooth and homogenized. At this stage, ensure the gelling agent solution (prepared according to package directions, usually dissolved in hot water or milk) is mixed in quickly and thoroughly.
Step 4: Folding and Combining the Filling
Gently fold the reserved whipped cream into the cream cheese mixture using a spatula. Use smooth, light motions to avoid deflating the volume you built. The goal is a uniform, pale, and airy filling. This gentle folding technique prevents the cheesecake from becoming dense and gives it that signature melt-in-your-mouth texture.
Step 5: Setting the Cheesecake Structure
Pour the filling over the chilled crust in the springform pan. Smooth the top with the back of the spatula. For the signature swirl, warm 1/4 cup of the cookie spread slightly until pourable and drizzle it decoratively over the top. Use a knife or skewer to create swirls. Refrigerate the cheesecake for a minimum of 6 to 8 hours, or ideally overnight, allowing the gelling agent to fully set the structure.
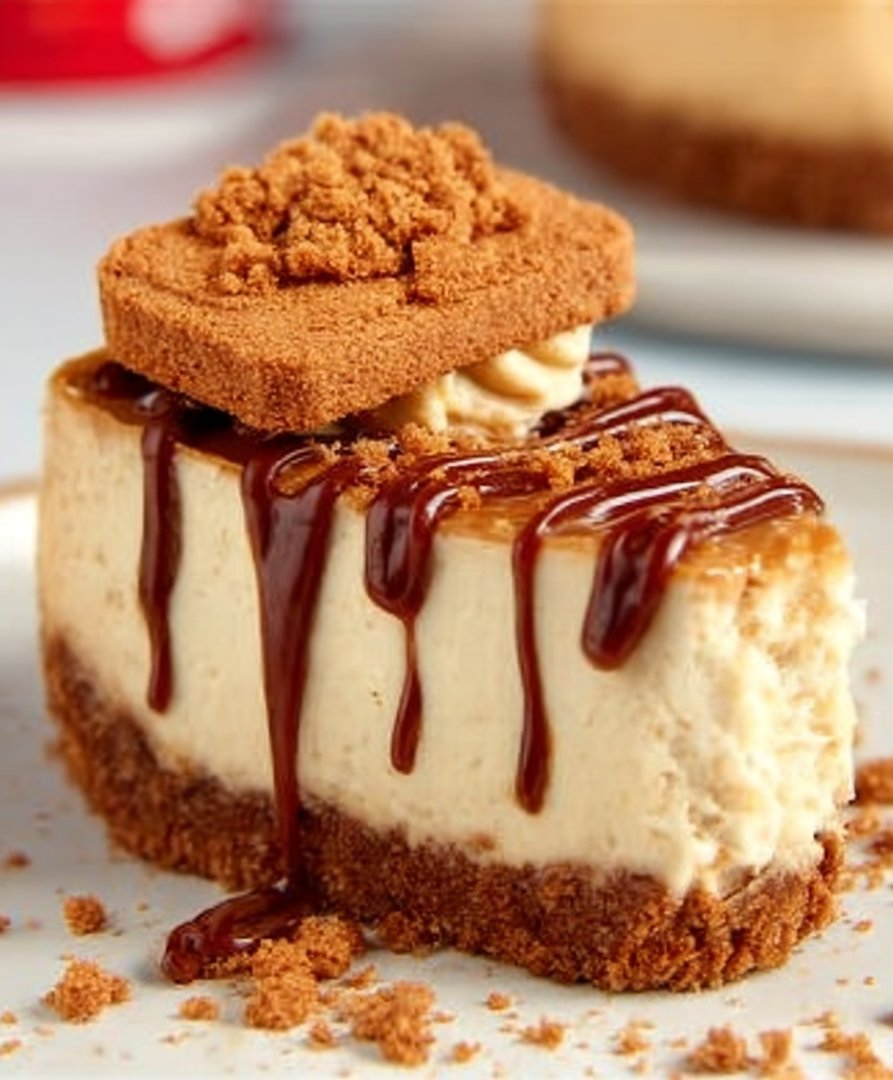
Transfer to plates and drizzle with extra melted cookie spread and sprinkle crushed cookies on top for the perfect finishing touch.
The Art of the Perfect Crust: Crunch and Caramel
The crust is not just a foundation; it’s the counterpoint to the creamy filling. We often overlook the subtle chemistry required to achieve that perfect crunch-to-crumb ratio. Using the precise amount of butter ensures the crust holds together without becoming overly greasy, which is a common pitfall. If your crust mixture feels too dry, add butter one teaspoon at a time; if it’s too wet, incorporate a few more crushed cookie crumbs.
Achieving a uniform density is also crucial. When pressing the crumbs into the pan, use the bottom of a measuring cup or a flat-bottomed glass to apply consistent, heavy pressure across the entire surface. This prevents the filling from leaking underneath and ensures the slice holds its structural integrity when served. Remember, the quality of the crust often dictates the perceived quality of the entire cheesecake.
The unique flavor of the spiced cookies introduces cinnamon and ginger notes that complement the richness of the cream cheese far better than a standard graham cracker crust. This specific pairing is what elevates this dessert from a simple cheesecake to an undeniable indulgence. Don’t skimp on chilling time for the crust; that initial freeze is what locks the butter and crumbs together, making them resilient enough to handle the weight of the filling.
The Science of Stability: Ensuring a No-Bake Success
Working with a no-bake recipe requires a delicate balance of fat, air, and stabilization. Since we are forgoing the oven, the structure relies heavily on the quality of the ingredients and the precise steps taken. The secret to avoiding a leaky, slumping cheesecake lies in two areas: the temperature of the cream cheese and the use of a stabilizing agent.
If the cream cheese isn’t truly room temperature, it won’t blend smoothly with the powdered sugar, leading to lumps that compromise the final texture. Furthermore, cold cream cheese prevents effective emulsification with the cookie spread. It should be soft enough to indent easily with a finger, but not melted. This careful temperature control is vital for a velvety smooth filling.
The stabilizing element, whether it’s agar-agar (a reliable plant-based alternative) or pectin, must be activated correctly. Often, this means dissolving it in a small amount of hot liquid before incorporating it rapidly into the finished cream cheese base. The addition of stiffly whipped heavy cream introduces volume and fat molecules that trap air. When this mixture cools, the fat firms up and the stabilizing agent sets, creating that sliceable, perfect texture we crave.
If you skip the stabilizer, you risk the cheesecake becoming a delicious but disappointing puddle when sliced. It’s the unsung hero of the no-bake world, quietly working its magic in the refrigerator while you patiently await dessert time. Patience during the final chilling stage is non-negotiable; rush it, and the cheesecake will collapse under the weight of expectation—and gravity.
Troubleshooting Common Cheesecake Woes
Even seasoned dessert warriors occasionally encounter pitfalls. One common issue is a crust that crumbles upon slicing. This usually happens because the crust wasn’t pressed firmly enough into the pan or there wasn’t enough butter used initially. If you find your crust too dry, you can always gently melt a tablespoon of butter, brush it over the surface of the chilled crust, and then refreeze it for ten minutes to lock it in place.
Another frequent complaint is a filling that remains too soft after adequate chilling. This often stems from not whipping the heavy cream to true stiff peaks, or from over-mixing the filling once the whipped cream has been folded in, which deflates the necessary air pockets. If your filling seems too soft before pouring, quickly assess if you adequately dissolved your gelling agent. If all else fails, pop the assembled cheesecake back into the freezer for 30 minutes before serving, which often buys you enough time for a clean slice.
Finally, achieving that signature swirl can sometimes look more like a muddy mess than an elegant decoration. The key here is temperature control for the cookie spread used on top. It needs to be just warm enough to be liquid and pourable, but not hot. Use a small squeeze bottle or a zip-top bag with a corner snipped off for better control when drizzling. Apply the spread in concentric circles or lines, then use a skewer or toothpick to gently drag through the spread for that marble effect, wiping the tool clean between passes.
Remember, the goal is effortless elegance. Don’t overthink the aesthetic too much; even a slightly messy swirl tastes just as phenomenal. Culinary perfection often lies less in flawless appearance and more in bold, consistent flavor delivery, and this recipe delivers on flavor every single time.
Mastering these simple steps and understanding the role of each key component ensures that your journey into crafting the perfect Biscoff cheesecake is smooth, successful, and incredibly delicious. Prepare yourself for compliments, because this dessert is truly a showstopper.
The Accidental Discovery of Sunshine on a Plate

I stumbled upon this recipe during a rainy afternoon, trying to recreate a forgotten airplane cookie experience. The resulting dessert was pure, unadulterated sunshine, proving that sometimes, the simplest ingredients hide the most delightful surprises in the kitchen.
If you have ever eaten a Biscoff cookie, you know that slightly spiced, caramel crunch flavor is utterly addictive. Translating that magic into a cheesecake is not just baking; it is a culinary mission. This isn’t just a standard cheesecake recipe that simply accepts a cookie crust; it is a declaration of love for speculoos, baked into every glorious layer. When you analyze the idealBiscoff Cheesecake Ingredients: A Complete Guide to Making the Perfect Dessert, you quickly realize success hinges on balance: a sturdy, crumbly base must support a light, yet rich, creamy filling.
Decoding the Magical Cookie Butter Base
The foundation is everything. Forget soggy, weak crusts that crumble under pressure. We need a hero. To achieve the perfect Biscoff crust, you crush the speculoos biscuits until they resemble fine sand. The binding agent is often melted butter, but quality matters here. Use unsalted butter for better control over the flavor profile. Press the mixture firmly into your springform pan. I mean, truly firmly. If you can lift the pan and the crust doesn’t budge, you’ve done it correctly. This crucial step prevents the dreaded “leaky crust” syndrome during the baking process and provides the necessary textural contrast to the smooth filling above. For an 8-inch cake, you usually need about two cups of crushed cookies and roughly half a cup of melted butter. Getting this ratio right is the difference between perfection and sad, crumbly disappointment.
The beauty of this base lies in its simplicity. It requires only two ingredients, yet it packs the most profound flavor punch. The caramel notes of the cookies deepen slightly when baked, creating an aromatic masterpiece. Many recipes suggest adding a pinch of cinnamon or brown sugar, but honestly, the Biscoff cookie is already doing the heavy lifting. Trust the process; the cookie knows what it is doing. If you are feeling extra adventurous, you can briefly pre-bake the crust for ten minutes, which stabilizes the base even further and locks in those toasted spice aromas before the heavy filling goes in. This also helps to ensure that when you slice the finished product, the crust stays exactly where it should be, providing that delightful structural integrity.
The Creamy, Cloud-Like Filling
Now we move to the star attraction: the filling. A truly decadent cheesecake filling requires full-fat cream cheese. Do not skimp here. Using low-fat or whipped versions will yield a disappointingly flat texture. Ensure the cream cheese is completely softened to room temperature before mixing. This is non-negotiable. Cold cream cheese leads to lumps, and nobody wants a lumpy cheesecake, not even if it tastes like speculoos. If you forgot to take it out, you can soften the foil-wrapped blocks in a bowl of warm water for ten minutes, but honestly, planning ahead is always better than rushing.
The filling components are surprisingly straightforward. Beyond the cream cheese, you’ll need granulated sugar, large eggs, sour cream (or Greek yogurt for tang and moisture), and a splash of pure vanilla bean paste. Some recipes use heavy cream, but I find sour cream provides that essential subtle tang that cuts through the intense sweetness of the cookie butter. The eggs act as the primary binding and setting agent. When mixing, avoid over-mixing, which incorporates too much air. Excess air is the enemy of a smooth, crack-free surface. Mix only until everything is just combined and the mixture looks silky smooth. A touch of ground ginger or extra cinnamon in the filling beautifully complements the speculoos flavor, amplifying the subtle spice already present in the cookies.
One essential detail many home bakers overlook is the temperature of the eggs. If the eggs are cold, they will seize up the perfectly blended cream cheese, creating those annoying little curds. Gently crack them into a separate bowl and allow them to reach room temperature alongside your dairy. When adding them to the batter, mix them in one at a time, incorporating each fully before adding the next. This careful, methodical approach ensures that the structure of the filling is uniform and guaranteed to bake into a velvety cloud of goodness. The subtle addition of the actual Biscoff spread, swirled gently into the top layer of the batter, further intensifies the overall flavor experience, making this a true speculoos powerhouse.
Perfecting the Cooking Process
Always prepare the crust first, chilling it while you prepare the creamy filling. Once assembled in the pan, implement the water bath immediately. Bake low and slow for that signature smooth texture, and then chill completely, ideally overnight, before attempting to slice.
The Water Bath: Your Secret Weapon Against Cracks
The most common cheesecake tragedy is the dreaded crack. It starts innocently enough, just a hairline fracture, but soon it turns your masterpiece into a geological fault line. The simple solution is the water bath (or bain-marie). Wrapping your springform pan tightly in heavy-duty aluminum foil, usually two layers, prevents water seepage. The water bath ensures that the oven heat is distributed gently and evenly. It creates a humid environment, which allows the cheesecake to set slowly from the edges inward, reducing temperature shock and preventing the surface from drying out and splitting. This process ensures the center cooks slowly, preserving that luxurious, creamy texture we crave in a high-quality cheesecake.
You bake the cheesecake until the edges are set, but the center still has a slight jiggle, like firm jelly. This usually takes about 60 to 75 minutes, depending on your oven calibration. Crucially, turn off the oven and let the cake cool inside the oven with the door propped open for an hour. This gradual cooling process is just as important as the baking itself, safeguarding that velvety texture we aim for. Only once it reaches room temperature can you move it to the refrigerator for its final, necessary chill time. Trying to rush this final step is a grave mistake; the chilling allows the fats to solidify and the flavors to fully meld, resulting in a cake that slices cleanly and tastes profoundly better.
Add Your Touch
To personalize the dessert, try swirling melted Biscoff spread directly into the filling before baking for an intense caramel note. Alternatively, swap out the Biscoff crust for a graham cracker or vanilla wafer base, using the same measurements, if you seek textural variety.
Optional Toppings to Elevate the Experience
The sheer decadence of this dessert means it stands perfectly well on its own, but who can resist a little extra embellishment? The most natural topping is melted Biscoff spread drizzled generously over the chilled cake. Warm the spread gently in the microwave until it reaches a pourable consistency, then create a gorgeous marble effect or a simple glaze. If you prefer a less intense flavor, dilute the spread slightly with a teaspoon of neutral vegetable oil before drizzling.
For additional flair, consider adding whipped cream dusted with crushed Biscoff crumbs, or perhaps a homemade caramel sauce. If you want a fruity counterpoint, a simple spiced pear or apple chutney pairs beautifully with the speculoos flavor profile, adding a welcome tartness to balance the richness. Remember, when adding fresh fruit or topping sauces, always wait until the cake is fully chilled and ready to serve; this maintains the structural integrity and aesthetic appeal. Don’t underestimate the power of a simple dusting of powdered sugar just before serving for an elegant, understated presentation.
Storing & Reheating
Store the chilled cheesecake tightly covered in the refrigerator for up to five days; it actually improves in flavor overnight! Do not attempt to reheat; this dessert is best enjoyed icy cold, straight from the fridge for maximum creamy pleasure.
My grandmother once tasted this cheesecake and declared it the only dessert worth flying overseas for. Her enthusiasm truly confirmed that the effort put into sourcing the perfectBiscoff Cheesecake Ingredientspaid off.
Expert Tips for Biscoff Brilliance
-
Always ensure your cream cheese, eggs, and sour cream are at true room temperature; this prevents lumps and guarantees a perfectly smooth, uniform batter.
-
Do not skip the gradual cooling process; leaving the cheesecake in the turned-off oven prevents rapid temperature drops that often cause surface cracks.
-
Use a long, thin, hot knife dipped in boiling water and wiped clean between slices to achieve those professional, photogenic cuts.
Conclusion for Biscoff Cheesecake Ingredients: A Complete Guide to Making the Perfect Dessert
Mastering this iconic dessert revolves entirely around selecting and handling the correctBiscoff Cheesecake Ingredients: A Complete Guide to Making the Perfect Dessert. We established that starting with a firm, buttery speculoos crust is key, followed by a rich, lump-free, full-fat cream cheese filling.
Remember that patience is vital. The water bath technique and the crucial overnight chilling period are not optional steps but necessary investments in achieving that signature smooth, unblemished surface and velvety interior. Armed with these techniques and components, you are now ready to bake a showstopper that will instantly become a cherished favorite among your friends and family.
PrintBiscoff Cheesecake Ingredients: A Complete Guide to Making the Perfect Dessert
Indulge in velvety smooth Biscoff Cheesecake! We blend rich cream cheese with a full cup of caramelized cookie spread for a dense, melt-in-your-mouth filling, set on a buttery Speculoos crust.
- Prep Time: 15 minutes
- Cook Time: 20 minutes
- Total Time: 35 minutes
- Yield: 4 servings
- Method: Stovetop
- Cuisine: American
Ingredients
- Cream cheese (900g), full-fat and softened
- Biscoff cookies (250g), finely crushed
- Unsalted butter (115g), melted
- Granulated sugar (200g)
- Biscoff cookie spread (1 cup), divided
- Large eggs (3), lightly beaten
- vanilla bean paste (1 teaspoon)
Instructions
- Step 1: Preheat the oven to 160°C (325°F). Combine the crushed Biscoff cookies and melted butter, mixing thoroughly. Press the mixture firmly and evenly into the bottom of a greased 23cm springform pan. Set aside.
- Step 2: In a large bowl, beat the softened cream cheese until smooth. Gradually add the granulated sugar, vanilla bean paste, and 1/2 cup of the Biscoff spread, mixing until fully incorporated and lump-free.
- Step 3: Gently beat in the lightly whisked eggs, one at a time, mixing only until just combined to avoid overmixing. Pour the cheesecake batter over the prepared Biscoff crust.
- Step 4: Prepare a water bath (bain-marie) by wrapping the outside of the springform pan tightly in aluminum foil, and placing it into a larger roasting pan. Carefully pour boiling water into the roasting pan until it reaches halfway up the side of the cheesecake pan. Bake for 60–75 minutes, or until the edges are set and the center slightly jiggles.
- Step 5: Turn off the oven, prop the oven door slightly ajar, and allow the cheesecake to cool slowly inside the oven for 1 hour. Remove the cheesecake from the water bath, cool completely on a wire rack, and then refrigerate for a minimum of 6 hours or preferably overnight.
- Step 6: Just before serving, gently warm the remaining 1/2 cup of Biscoff spread until pourable, then drizzle or spread it evenly over the chilled cheesecake.
Notes
- Keep leftover slices stored in an airtight container in the fridge for peak freshness and enjoyment within five days.
- Since this dessert is served chilled, only the final 1/2 cup of Biscoff topping requires gentle warming (about 10-15 seconds) to achieve that perfect, glossy drizzle consistency.
- Elevate the texture and presentation by serving each slice with a generous dollop of unsweetened whipped cream and a light scattering of finely crushed Biscoff crumbs.
- To guarantee a silky, lump-free filling, ensure your cream cheese is truly at room temperature before beating, and remember to mix the eggs only until just combined to prevent cracks during baking.
Nutrition
- Serving Size: 1 standard slice (approx. 1/16th of 9-inch cake)
- Calories: 505
- Sodium: 315mg
- Fat: 34g
- Saturated Fat: 20g
- Trans Fat: 0.5g
- Protein: 39g

Leave a Comment