

Chinese Swiss Roll: A Delightful Fusion of Flavors
Chinese Swiss Roll is a delightful dessert that beautifully marries the lightness of a traditional Swiss roll with the unique flavors of Chinese cuisine. This enchanting treat has captured the hearts of many, and it’s easy to see why. With its soft, fluffy sponge cake and a variety of delicious fillings, the Chinese Swiss Roll offers a taste experience that is both comforting and exotic.
The origins of the Swiss roll can be traced back to Europe, but it has been embraced and adapted by various cultures, including Chinese culinary traditions. In China, the Swiss roll has evolved to incorporate local flavors such as matcha, red bean, and even tropical fruits, making it a versatile dessert that appeals to a wide range of palates.
People love the Chinese Swiss Roll not only for its delightful taste and texture but also for its convenience. It’s a perfect dessert for gatherings, celebrations, or simply a sweet treat to enjoy at home. The combination of a light sponge and creamy filling creates a melt-in-your-mouth experience that leaves you wanting more. Join me as we explore the art of making this exquisite dessert and discover why the Chinese Swiss Roll is a must-try for any dessert lover!

Ingredients:
- 4 large eggs
- 100g (1/2 cup) granulated sugar
- 80g (2/3 cup) all-purpose flour
- 20g (2 tablespoons) cornstarch
- 1 teaspoon baking powder
- 1/4 teaspoon salt
- 40g (3 tablespoons) unsalted butter, melted
- 1 teaspoon vanilla extract
- 200g (1 cup) whipped cream
- 100g (1/2 cup) fresh strawberries, sliced
- Powdered sugar, for dusting
Preparing the Batter
- Preheat your oven to 180°C (350°F). Line a 10×15 inch (25×38 cm) baking tray with parchment paper, ensuring the paper hangs over the edges for easy removal later.
- In a large mixing bowl, crack the 4 large eggs and add the 100g of granulated sugar. Using an electric mixer, beat the mixture on high speed for about 5-7 minutes until it becomes thick, pale, and fluffy. This step is crucial as it incorporates air into the eggs, giving the roll its light texture.
- In a separate bowl, sift together the 80g of all-purpose flour, 20g of cornstarch, 1 teaspoon of baking powder, and 1/4 teaspoon of salt. This helps to aerate the dry ingredients and ensures an even distribution of the baking powder.
- Gently fold the dry ingredients into the egg mixture using a spatula. Be careful not to deflate the batter; use a gentle folding motion until just combined.
- In a small bowl, mix the 40g of melted unsalted butter with 1 teaspoon of vanilla extract. Drizzle this mixture into the batter and fold it in gently until fully incorporated.
Baking the Cake
- Pour the batter into the prepared baking tray, spreading it evenly with a spatula. Tap the tray gently on the counter to remove any air bubbles.
- Bake in the preheated oven for 12-15 minutes, or until the cake is lightly golden and springs back when touched. Keep an eye on it to avoid overbaking, as this can make the cake dry.
- Once baked, remove the tray from the oven and let it cool for about 5 minutes. Then, carefully invert the cake onto a clean kitchen towel dusted with powdered sugar. Peel off the parchment paper.
- While the cake is still warm, roll it up tightly with the towel, starting from one of the shorter ends. This helps to shape the roll and prevent cracking. Allow it to cool completely in this rolled position.
Preparing the Filling
- While the cake is cooling, prepare the filling. In a mixing bowl, whip the 200g of heavy cream until soft peaks form. You can add a tablespoon of sugar if you prefer a sweeter filling.
- Once the cream is whipped, gently fold in the sliced strawberries. This adds a fresh flavor and a beautiful color to the filling.
Assembling the Swiss Roll
- Once the cake has cooled completely, carefully unroll it from the towel. Spread the whipped cream and strawberry mixture evenly over the surface of the cake, leaving a small border around the edges.
- Starting from the edge closest to you, roll the cake back up tightly, this time without the towel. Use the parchment paper to help guide the roll if needed.
- Once rolled, place the Swiss roll seam-side down on a serving platter. You can trim the ends for a cleaner look if desired.
- Dust the top with powdered sugar for a beautiful finish. You can also decorate with additional strawberries or whipped cream if you like.
Chilling and Serving
- For the best flavor and texture, refrigerate the Swiss roll for at least 30 minutes before slicing. This allows the filling to set and makes it easier to cut.
- When ready to serve, use a sharp knife to slice the roll into even pieces
Conclusion:
If you’re looking for a delightful dessert that combines the lightness of a sponge cake with the rich flavors of traditional Chinese ingredients, then this Chinese Swiss Roll is an absolute must-try! The fluffy texture and the sweet, creamy filling create a perfect harmony that will leave your taste buds dancing. Not only is it visually stunning, but it also offers a unique twist on the classic Swiss roll that is sure to impress your family and friends.
When it comes to serving suggestions, the possibilities are endless! You can enjoy your Chinese Swiss Roll as a standalone dessert, or pair it with a cup of freshly brewed tea for a delightful afternoon treat. For a more festive presentation, consider dusting the top with powdered sugar or drizzling a bit of chocolate sauce over it. You could also serve it alongside fresh fruits like strawberries or mango slices to add a refreshing contrast to the sweetness of the roll. If you’re feeling adventurous, try adding a scoop of green tea or red bean ice cream on the side for an extra layer of flavor that complements the roll beautifully.
As for variations, feel free to get creative! You can experiment with different fillings such as matcha cream, taro paste, or even a fruity jam to suit your taste preferences. If you want to add a bit of crunch, consider incorporating crushed nuts or a sprinkle of sesame seeds into the filling. The beauty of the Chinese Swiss Roll is its versatility, allowing you to customize it to your liking while still maintaining that signature light and airy texture.
I wholeheartedly encourage you to give this Chinese Swiss Roll recipe a try! It’s not only a fun baking project but also a rewarding experience when you see the smiles on your loved ones’ faces as they take their first bite. Don’t forget to share your experience with us! Whether you stick to the classic recipe or put your own spin on it, we’d love to hear how it turned out for you. Snap a photo and tag us on social media, or leave a comment below to let us know your thoughts. Happy baking, and enjoy every delicious slice of your homemade Chinese Swiss Roll!
Chinese Swiss Roll: A Delicious Twist on a Classic Dessert
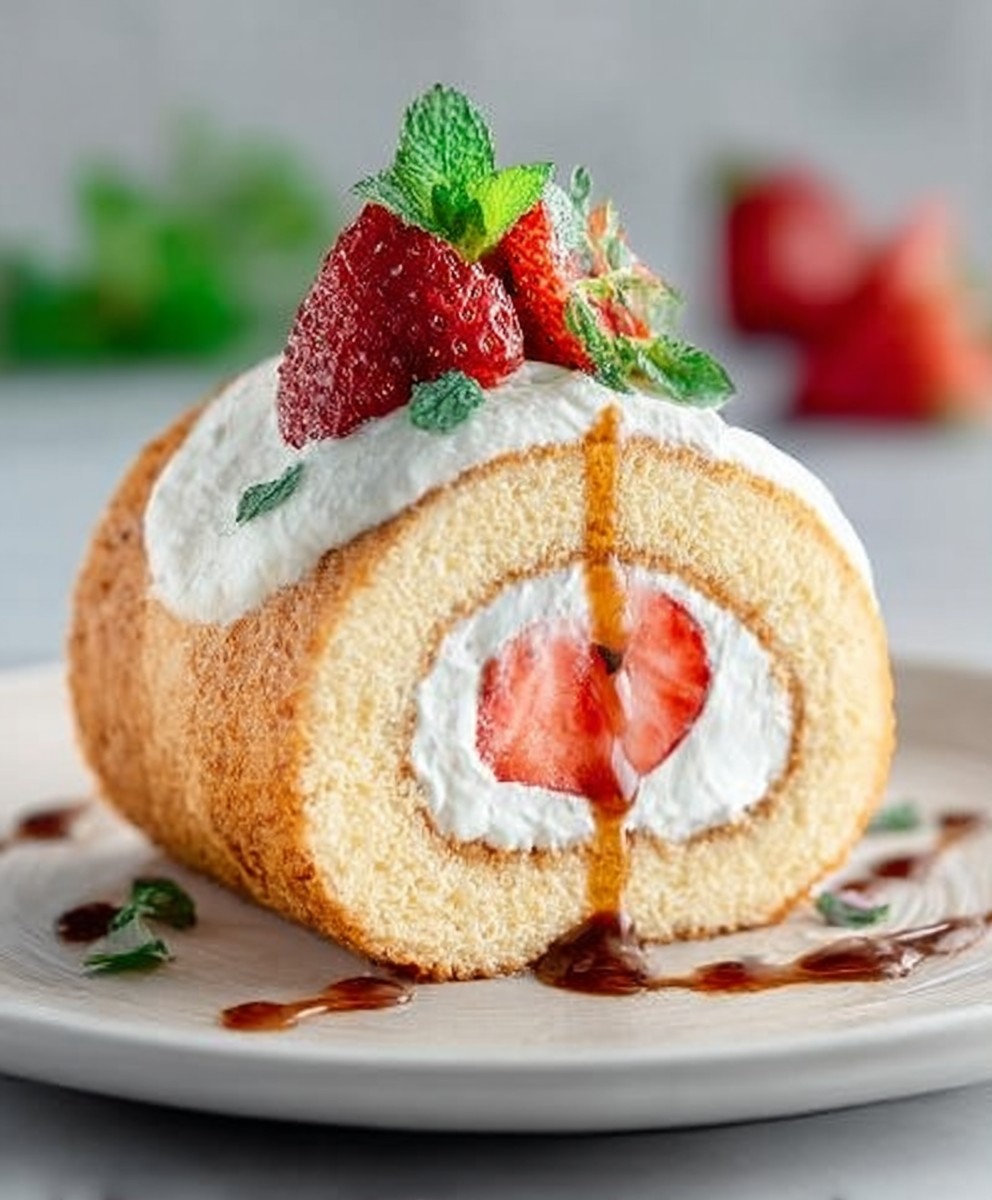
This Swiss Roll features a light and fluffy cake filled with whipped cream and fresh strawberries, making it an ideal dessert for any occasion. Its airy texture and sweet filling are sure to impress your guests and satisfy your cravings!
Ingredients
- 4 large eggs
- 100g (1/2 cup) granulated sugar
- 80g (2/3 cup) all-purpose flour
- 20g (2 tablespoons) cornstarch
- 1 teaspoon baking powder
- 1/4 teaspoon salt
- 40g (3 tablespoons) unsalted butter, melted
- 1 teaspoon vanilla extract
- 200g (1 cup) whipped cream
- 100g (1/2 cup) fresh strawberries, sliced
- Powdered sugar, for dusting
Instructions
- Preheat your oven to 180°C (350°F). Line a 10×15 inch (25×38 cm) baking tray with parchment paper, ensuring the paper hangs over the edges for easy removal later.
- In a large mixing bowl, crack the 4 large eggs and add the 100g of granulated sugar. Using an electric mixer, beat the mixture on high speed for about 5-7 minutes until it becomes thick, pale, and fluffy.
- In a separate bowl, sift together the 80g of all-purpose flour, 20g of cornstarch, 1 teaspoon of baking powder, and 1/4 teaspoon of salt.
- Gently fold the dry ingredients into the egg mixture using a spatula until just combined.
- In a small bowl, mix the 40g of melted unsalted butter with 1 teaspoon of vanilla extract. Drizzle this mixture into the batter and fold it in gently until fully incorporated.
- Pour the batter into the prepared baking tray, spreading it evenly with a spatula. Tap the tray gently on the counter to remove any air bubbles.
- Bake in the preheated oven for 12-15 minutes, or until the cake is lightly golden and springs back when touched.
- Once baked, remove the tray from the oven and let it cool for about 5 minutes. Carefully invert the cake onto a clean kitchen towel dusted with powdered sugar. Peel off the parchment paper.
- While the cake is still warm, roll it up tightly with the towel, starting from one of the shorter ends. Allow it to cool completely in this rolled position.
- While the cake is cooling, whip the 200g of heavy cream until soft peaks form. Optionally, add a tablespoon of sugar for a sweeter filling.
- Gently fold in the sliced strawberries.
- Once the cake has cooled completely, carefully unroll it from the towel. Spread the whipped cream and strawberry mixture evenly over the surface of the cake, leaving a small border around the edges.
- Starting from the edge closest to you, roll the cake back up tightly without the towel. Use the parchment paper to help guide the roll if needed.
- Place the Swiss roll seam-side down on a serving platter. Trim the ends for a cleaner look if desired.
- Dust the top with powdered sugar and decorate with additional strawberries or whipped cream if desired.
- Refrigerate the Swiss roll for at least 30 minutes before slicing to allow the filling to set.
- When ready to serve, use a sharp knife to slice the roll into even pieces.
Notes
- Ensure the eggs are at room temperature for better volume when beaten.
- Be gentle when folding in the dry ingredients to maintain the airiness of the batter.
- You can substitute strawberries with other fruits like raspberries or blueberries for variation.


Leave a Comment