
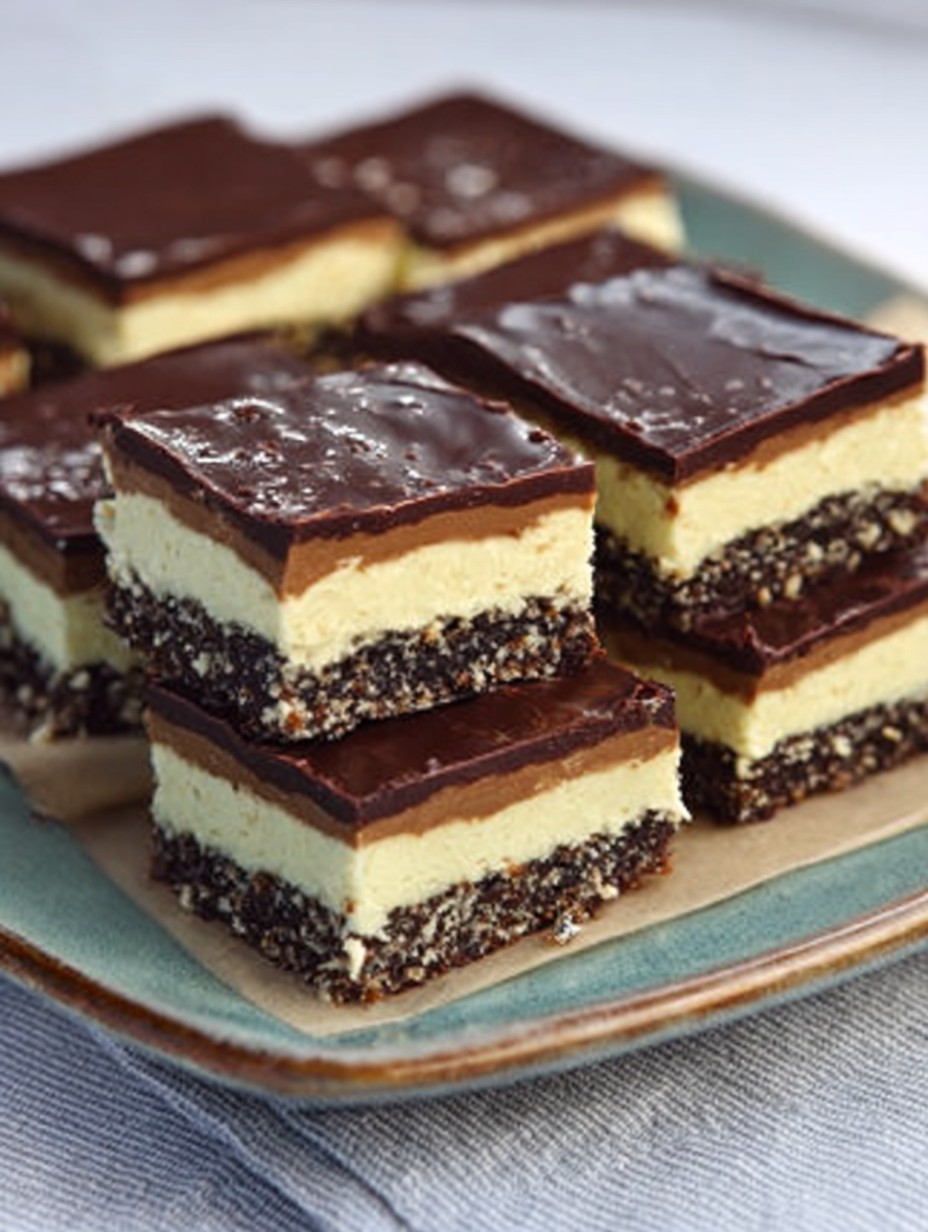
Nanaimo Bars are a delightful no-bake dessert that has captured the hearts of many across Canada and beyond. Originating from the city of Nanaimo in British Columbia, these bars boast a rich history that dates back to the 1950s, when they were first featured in a local cookbook. The combination of a crumbly base, a creamy custard middle, and a rich chocolate topping creates a symphony of flavors and textures that is simply irresistible.
People love Nanaimo Bars not only for their delicious taste but also for their convenience; they require no baking and can be prepared in just a few simple steps. The contrast between the crunchy base and the smooth filling makes each bite a delightful experience. Whether you’re hosting a gathering or simply indulging in a sweet treat at home, these bars are sure to impress. Join me as we explore the art of making these iconic Canadian treats!

Ingredients:
- For the Base Layer:
- 1/2 cup unsalted butter, softened
- 1/4 cup granulated sugar
- 1/2 cup graham cracker crumbs
- 1/2 cup shredded coconut
- 1/4 cup unsweetened cocoa powder
- 1/2 cup chopped walnuts (optional)
- For the Custard Layer:
- 1/2 cup unsalted butter, softened
- 2 cups powdered sugar
- 2 tablespoons vanilla custard powder (or instant vanilla pudding mix)
- 2 tablespoons milk
- 1 teaspoon vanilla extract
- For the Chocolate Topping:
- 4 ounces semi-sweet chocolate, chopped
- 2 tablespoons unsalted butter
Preparing the Base Layer
- In a medium mixing bowl, combine the softened butter and granulated sugar. Using a hand mixer or a whisk, cream them together until the mixture is light and fluffy.
- Next, add the graham cracker crumbs, shredded coconut, cocoa powder, and chopped walnuts (if using) to the bowl. Mix everything together until well combined. The mixture should be crumbly but hold together when pressed.
- Line an 8-inch square baking dish with parchment paper, leaving some overhang for easy removal later. Press the base layer mixture evenly into the bottom of the prepared dish. Use the back of a measuring cup or your hands to pack it down firmly.
Preparing the Custard Layer
- In a clean mixing bowl, beat the softened butter until creamy. This should take about 1-2 minutes.
- Gradually add the powdered sugar and custard powder (or pudding mix) to the bowl. Mix on low speed until combined, then increase to medium speed and beat until the mixture is smooth and fluffy.
- Add the milk and vanilla extract to the mixture. Continue to beat until everything is well incorporated and the custard layer is light and creamy.
- Spread the custard layer evenly over the base layer in the baking dish. Use a spatula to smooth it out, ensuring it reaches the edges.
Preparing the Chocolate Topping
- In a small saucepan over low heat, combine the chopped semi-sweet chocolate and unsalted butter. Stir continuously until the chocolate and butter are melted and smooth. Be careful not to overheat, as chocolate can burn easily.
- Once melted, remove the saucepan from the heat and let it cool for a few minutes. This will prevent the chocolate from melting the custard layer when poured on top.
- Pour the melted chocolate mixture over the custard layer in the baking dish. Use a spatula to spread it evenly, ensuring it covers the entire surface.
Chilling and Serving
- Cover the baking dish with plastic wrap or aluminum foil and place it in the refrigerator. Allow the bars to chill for at least 2-3 hours, or until the chocolate topping is set and the layers are firm.
- Once chilled, remove the bars from the baking dish using the parchment paper overhang. Place them on a cutting board.
- Using a sharp knife, cut the bars into squares or rectangles, depending on your preference. Wipe the knife with a damp cloth between cuts to ensure clean edges.
- Serve the Nanaimo bars chilled or at room temperature. They can be stored in an airtight container in the refrigerator for up to a week.
Tips for Perfect Nanaimo Bars
- Make sure your butter is softened for both the base and custard layers. This helps in achieving a smooth texture.
- If you prefer a nut-free version, simply omit the walnuts from the base layer.
- For a richer chocolate topping, you can use dark chocolate instead of semi-sweet chocolate.
- 1/2 cup unsalted butter, softened
- 1/4 cup granulated sugar
- 1/2 cup graham cracker crumbs
- 1/2 cup shredded coconut
- 1/4 cup unsweetened cocoa powder
- 1/2 cup chopped walnuts (optional)
- 1/2 cup unsalted butter, softened
- 2 cups powdered sugar
- 2 tablespoons vanilla custard powder (or instant vanilla pudding mix)
- 2 tablespoons milk
- 1 teaspoon vanilla extract
- 4 ounces semi-sweet chocolate, chopped
- 2 tablespoons unsalted butter
- In a medium mixing bowl, combine the softened butter and granulated sugar. Using a hand mixer or a whisk, cream them together until the mixture is light and fluffy.
- Add the graham cracker crumbs, shredded coconut, cocoa powder, and chopped walnuts (if using) to the bowl. Mix until well combined. The mixture should be crumbly but hold together when pressed.
- Line an 8-inch square baking dish with parchment paper, leaving some overhang for easy removal. Press the base layer mixture evenly into the bottom of the prepared dish, packing it down firmly.
- In a clean mixing bowl, beat the softened butter until creamy, about 1-2 minutes.
- Gradually add the powdered sugar and custard powder (or pudding mix). Mix on low speed until combined, then increase to medium speed and beat until smooth and fluffy.
- Add the milk and vanilla extract, continuing to beat until well incorporated and the custard layer is light and creamy.
- Spread the custard layer evenly over the base layer in the baking dish, smoothing it out with a spatula.
- In a small saucepan over low heat, combine the chopped semi-sweet chocolate and unsalted butter. Stir continuously until melted and smooth, being careful not to overheat.
- Remove from heat and let cool for a few minutes to prevent melting the custard layer when poured on top.
- Pour the melted chocolate mixture over the custard layer, spreading it evenly with a spatula.
- Cover the baking dish with plastic wrap or aluminum foil and refrigerate for at least 2-3 hours, or until the chocolate topping is set and the layers are firm.
- Once chilled, remove the bars from the baking dish using the parchment paper overhang and place them on a cutting board.
- Cut into squares or rectangles with a sharp knife, wiping the knife with a damp cloth between cuts for clean edges.
- Serve chilled or at room temperature. Store in an airtight container in the refrigerator for up to a week.
- Ensure butter is softened for both layers to achieve a smooth texture.
- For a nut-free version, omit the walnuts.
- For a richer chocolate topping, consider using dark chocolate instead of semi-sweet.
Conclusion:
If you’re looking for a delightful treat that combines rich flavors and a satisfying texture, then this Nanaimo Bars recipe is an absolute must-try! These no-bake bars are not only easy to prepare but also offer a perfect balance of chocolate, custard, and coconut that will leave your taste buds dancing with joy. The layers of crumbly base, creamy filling, and smooth chocolate topping create a dessert that is both visually appealing and irresistibly delicious.
One of the best things about Nanaimo Bars is their versatility. You can easily customize the recipe to suit your preferences or dietary needs. For a nut-free version, simply omit the nuts from the base or substitute them with seeds. If you want to add a twist, consider incorporating different flavors into the custard layer, such as almond extract or a hint of coffee for a mocha variation. You can also experiment with toppings by drizzling melted white chocolate over the dark chocolate layer for an elegant finish.
When it comes to serving suggestions, these bars are perfect for any occasion. Whether you’re hosting a casual get-together, celebrating a birthday, or simply indulging in a sweet treat after dinner, Nanaimo Bars are sure to impress your guests. They can be cut into small squares for bite-sized delights or served as larger pieces for a more decadent experience. Pair them with a cup of coffee or tea for a delightful afternoon snack, or enjoy them as a sweet ending to a family meal.
I encourage you to give this Nanaimo Bars recipe a try! It’s a fun and rewarding baking project that will not only satisfy your sweet tooth but also impress your friends and family. Once you’ve made your own batch, I would love to hear about your experience. Did you stick to the classic recipe, or did you try out some of the variations? Share your thoughts and any creative twists you added in the comments below! Your feedback and experiences can inspire others to dive into this delicious dessert as well.
So, roll up your sleeves, gather your ingredients, and get ready to enjoy the delightful layers of this classic Canadian treat. Trust me, once you take that first bite of your homemade Nanaimo Bars, you’ll understand why they are a beloved favorite. Happy baking!
Nanaimo Bars: The Ultimate No-Bake Dessert Recipe You Need to Try
Enjoy the delicious layers of Nanaimo Bars, a no-bake dessert featuring a crumbly base, creamy custard filling, and rich chocolate topping. These sweet treats are perfect for any occasion and are sure to please your taste buds!


Leave a Comment