
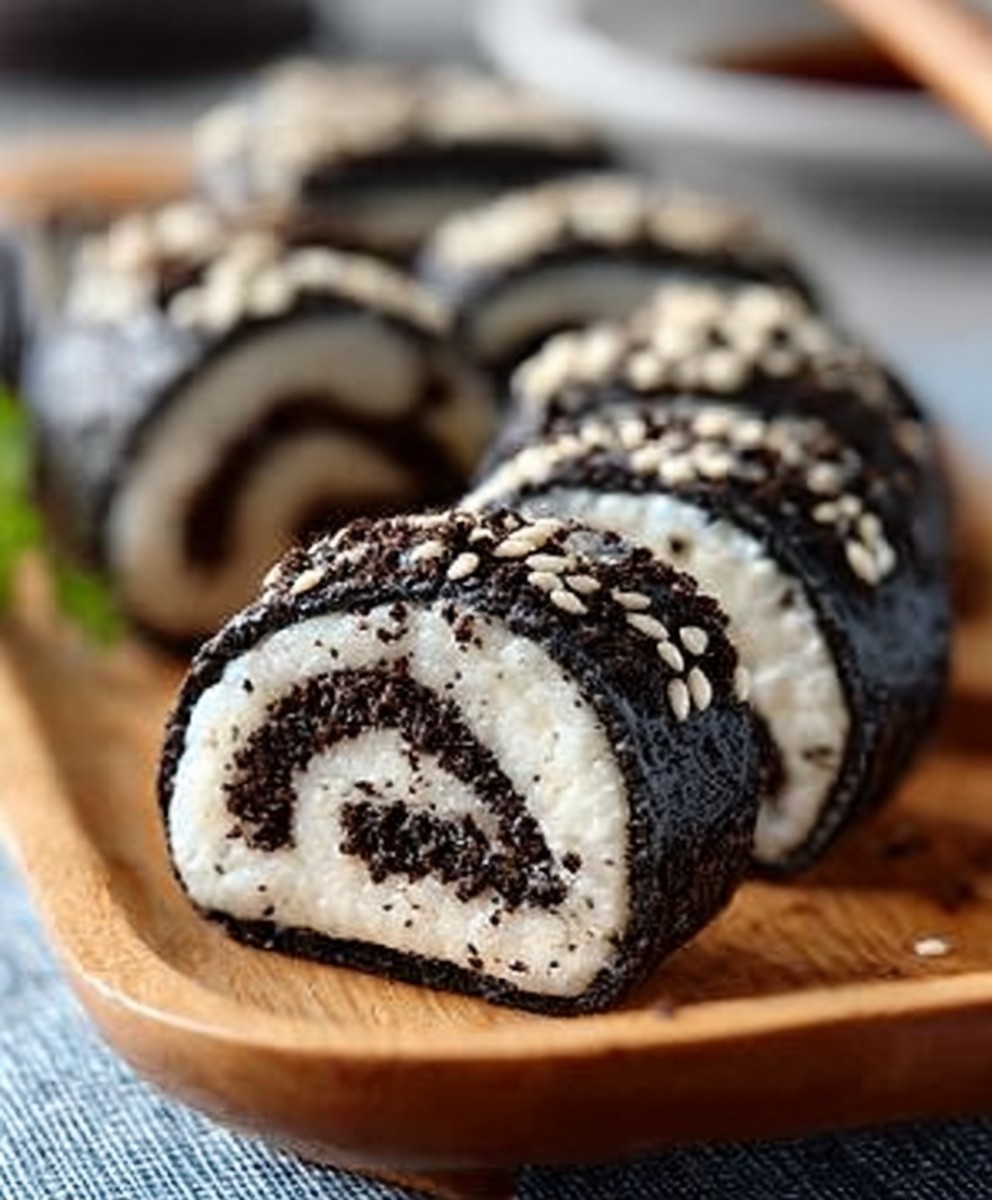
Oreo Sushi Rolls: A Sweet Twist on a Classic Favorite
Oreo Sushi Rolls are a delightful fusion of flavors that will tantalize your taste buds and impress your friends. Imagine the creamy, rich taste of Oreos wrapped in a sweet, sticky rice, creating a unique dessert that is both fun to make and even more enjoyable to eat. This innovative treat has gained popularity in recent years, especially among dessert enthusiasts looking for something different to satisfy their sweet cravings.
The concept of Oreo Sushi Rolls combines the beloved cookie with the art of sushi-making, resulting in a dish that is not only visually appealing but also incredibly delicious. People love this dish for its delightful texture—crunchy on the outside and soft on the inside—as well as its convenience. You can whip up these rolls in no time, making them perfect for parties, gatherings, or simply a fun afternoon snack.
Whether you’re a sushi lover or an Oreo aficionado, Oreo Sushi Rolls are sure to become a favorite in your dessert repertoire. So, let’s dive into this exciting recipe and discover how to create these mouthwatering treats!

Ingredients:
- 1 package of Oreo cookies (about 14 cookies)
- 1 cup of cream cheese, softened
- 1 cup of rice krispies cereal
- 1 cup of mini marshmallows
- 1 cup of gummy candies (like gummy worms or fruit snacks)
- 1 cup of chocolate syrup (for drizzling)
- 1/2 cup of shredded coconut (optional, for garnish)
- 1/2 cup of colorful sprinkles (optional, for garnish)
- 1 large sheet of nori (seaweed) or fruit leather (for a non-seaweed option)
Preparing the Filling
- Start by crushing the Oreo cookies. You can do this by placing them in a zip-top bag and using a rolling pin to crush them into fine crumbs. Alternatively, you can use a food processor for a quicker method.
- In a mixing bowl, combine the crushed Oreo cookies with the softened cream cheese. Use a spatula or a hand mixer to blend them together until you achieve a smooth and creamy mixture.
- Next, fold in the rice krispies cereal and mini marshmallows into the Oreo-cream cheese mixture. This will add a delightful crunch and texture to your filling.
- Finally, add the gummy candies to the mixture. You can chop them into smaller pieces if you prefer. Mix everything until well combined.
Preparing the Sushi Rolls
- Lay out a large sheet of nori or fruit leather on a clean, flat surface. If you are using nori, make sure the shiny side is facing down.
- Take a generous amount of the Oreo filling and spread it evenly over the nori or fruit leather, leaving about an inch of space at the top edge. Make sure to spread it evenly to ensure a good roll.
- Once the filling is spread, it’s time to roll! Starting from the bottom edge, carefully lift the nori or fruit leather and begin to roll it away from you, tucking the filling in as you go. Use your fingers to keep the filling in place and roll tightly but not too tight to avoid squeezing out the filling.
- When you reach the top edge, moisten it with a little water to help seal the roll. Press gently to secure it.
- Repeat the process with the remaining nori or fruit leather and filling until you have made all your rolls.
Cutting the Rolls
- Using a sharp knife, slice each roll into bite-sized pieces. I recommend cutting them into about 1-inch thick pieces for a perfect sushi-sized bite.
- To prevent the filling from sticking to the knife, you can dip the knife in warm water before each cut. This will help create clean edges.
Garnishing and Serving
- Once all the rolls are cut, arrange them on a serving platter. You can create a fun presentation by alternating the colors of the rolls if you used different types of fruit leather.
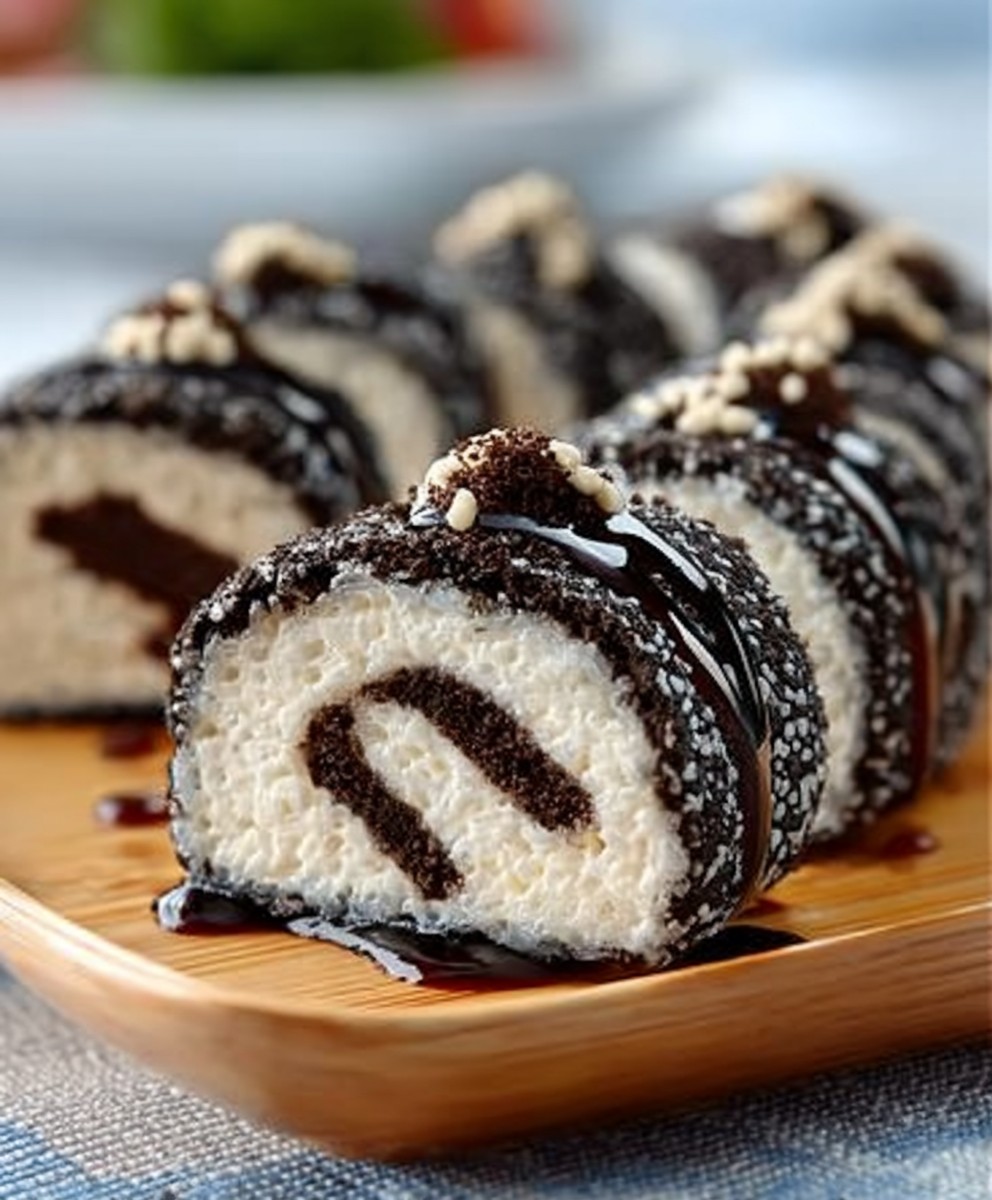
- Drizzle chocolate syrup over the top of the rolls for an extra touch of sweetness. You can also sprinkle shredded coconut and colorful sprinkles on top for added decoration and flavor.
- Serve the Oreo sushi rolls immediately, or refrigerate them for about 30 minutes to firm up before serving. They can be enjoyed cold or at room temperature.
Tips for Success
- Feel free to customize the filling by adding other ingredients like crushed nuts, chocolate chips, or different types of candies.
- If you want to make the rolls more colorful, consider using different flavors of fruit leather or adding food coloring to the cream cheese mixture.
- These rolls are perfect for parties, gatherings, or just a fun dessert at home. They are sure to impress both kids and adults alike!
Storage Instructions
- If you have any leftovers, store them in an airtight container in the refrigerator. They are best enjoyed within 2-3 days.
- To keep the rolls from getting soggy, try to separate layers with parchment paper if stacking them
Conclusion:
If you’re looking for a fun and unique dessert that will impress your friends and family, then these Oreo Sushi Rolls are an absolute must-try! Not only are they visually stunning, but they also combine the beloved flavors of Oreos with the playful presentation of sushi. The creamy filling, crunchy cookie texture, and the delightful sweetness make each bite a delightful experience. Plus, they are incredibly easy to make, which means you can whip them up for any occasion, whether it’s a birthday party, a casual get-together, or just a sweet treat for yourself.
When it comes to serving suggestions, the possibilities are endless! You can serve these Oreo Sushi Rolls on a beautiful platter, garnished with fresh fruit like strawberries or blueberries for a pop of color. Drizzling some chocolate or caramel sauce over the top can elevate the presentation even further. For a fun twist, consider adding a scoop of vanilla ice cream on the side, allowing your guests to enjoy a delightful contrast of temperatures and textures. If you want to get creative, you can also experiment with different fillings. Try adding peanut butter, Nutella, or even a layer of fruit preserves to the cream cheese mixture for a unique flavor profile.
I encourage you to gather your ingredients and give this recipe a try! It’s a fantastic way to bond with family or friends in the kitchen, and I promise you’ll have a blast rolling them up. Once you’ve made your own Oreo Sushi Rolls, I would love to hear about your experience! Did you stick to the classic recipe, or did you try out some of your own variations? Share your thoughts and any creative twists you came up with in the comments below or on social media.
Remember, the joy of cooking comes not just from the final product but also from the process and the memories you create along the way. So, roll up your sleeves, get those Oreos ready, and dive into this delicious adventure. I can’t wait to see how your Oreo Sushi Rolls turn out! Happy cooking!
Oreo Sushi Rolls: A Fun and Delicious Dessert Recipe
Enjoy a playful twist on dessert with these Oreo Sushi Rolls! Made with crushed Oreo cookies, cream cheese, rice krispies, and gummy candies, these fun treats are perfect for parties or a sweet snack. Roll them up in nori or fruit leather, slice into bite-sized pieces, and drizzle with chocolate syrup for a delightful finish.
Ingredients
- 1 package of Oreo cookies (about 14 cookies)
- 1 cup of cream cheese, softened
- 1 cup of rice krispies cereal
- 1 cup of mini marshmallows
- 1 cup of gummy candies (like gummy worms or fruit snacks)
- 1 cup of chocolate syrup (for drizzling)
- 1/2 cup of shredded coconut (optional, for garnish)
- 1/2 cup of colorful sprinkles (optional, for garnish)
- 1 large sheet of nori (seaweed) or fruit leather (for a non-seaweed option)
Instructions
- Start by crushing the Oreo cookies. You can do this by placing them in a zip-top bag and using a rolling pin to crush them into fine crumbs. Alternatively, you can use a food processor for a quicker method.
- In a mixing bowl, combine the crushed Oreo cookies with the softened cream cheese. Use a spatula or a hand mixer to blend them together until you achieve a smooth and creamy mixture.
- Next, fold in the rice krispies cereal and mini marshmallows into the Oreo-cream cheese mixture. This will add a delightful crunch and texture to your filling.
- Finally, add the gummy candies to the mixture. You can chop them into smaller pieces if you prefer. Mix everything until well combined.
- Lay out a large sheet of nori or fruit leather on a clean, flat surface. If you are using nori, make sure the shiny side is facing down.
- Take a generous amount of the Oreo filling and spread it evenly over the nori or fruit leather, leaving about an inch of space at the top edge. Make sure to spread it evenly to ensure a good roll.
- Once the filling is spread, it’s time to roll! Starting from the bottom edge, carefully lift the nori or fruit leather and begin to roll it away from you, tucking the filling in as you go. Use your fingers to keep the filling in place and roll tightly but not too tight to avoid squeezing out the filling.
- When you reach the top edge, moisten it with a little water to help seal the roll. Press gently to secure it.
- Repeat the process with the remaining nori or fruit leather and filling until you have made all your rolls.
- Using a sharp knife, slice each roll into bite-sized pieces. I recommend cutting them into about 1-inch thick pieces for a perfect sushi-sized bite.
- To prevent the filling from sticking to the knife, you can dip the knife in warm water before each cut. This will help create clean edges.
- Once all the rolls are cut, arrange them on a serving platter. You can create a fun presentation by alternating the colors of the rolls if you used different types of fruit leather.
- Drizzle chocolate syrup over the top of the rolls for an extra touch of sweetness. You can also sprinkle shredded coconut and colorful sprinkles on top for added decoration and flavor.
- Serve the Oreo sushi rolls immediately, or refrigerate them for about 30 minutes to firm up before serving. They can be enjoyed cold or at room temperature.
Notes
- Feel free to customize the filling by adding other ingredients like crushed nuts, chocolate chips, or different types of candies.
- If you want to make the rolls more colorful, consider using different flavors of fruit leather or adding food coloring to the cream cheese mixture.
- These rolls are perfect for parties, gatherings, or just a fun dessert at home. They are sure to impress both kids and adults alike!


Leave a Comment