
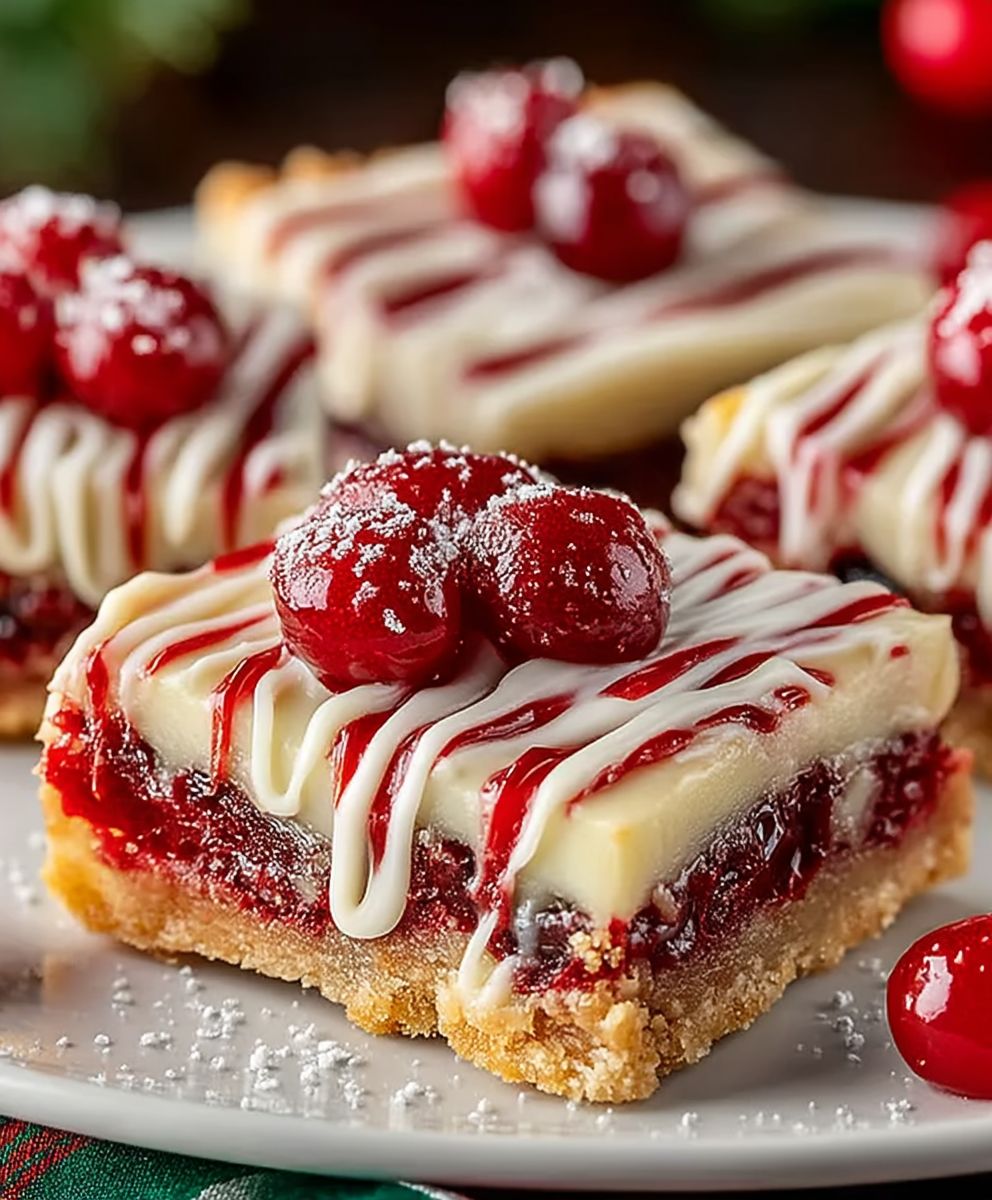
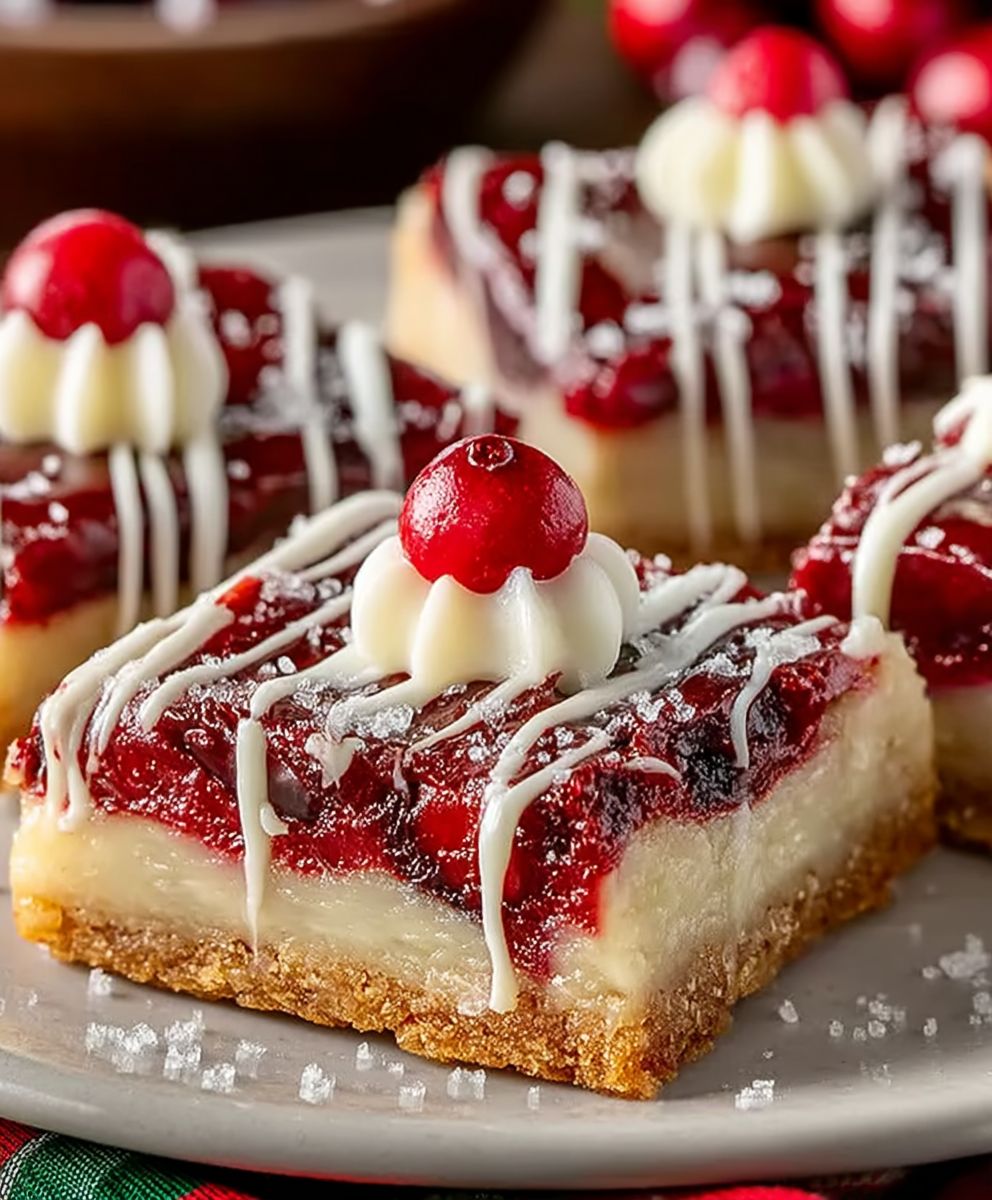
Ruby Red Cherry Bars: A Sweet Delight
Ruby Red Cherry Bars are a delightful treat that brings a burst of flavor and color to any dessert table. These bars are not just visually stunning; they are a perfect blend of sweet and tart, making them a favorite among dessert lovers. The vibrant red hue of the cherries not only makes these bars appealing but also adds a touch of nostalgia, reminiscent of summer picnics and family gatherings.
Historically, cherry desserts have been cherished in various cultures, often symbolizing abundance and prosperity. The use of cherries in baking dates back centuries, with recipes passed down through generations. Today, Ruby Red Cherry Bars continue to be a beloved choice for their convenience and ease of preparation. They are perfect for potlucks, parties, or simply as a sweet indulgence at home.
People adore Ruby Red Cherry Bars for their delightful taste and chewy texture. The combination of a buttery crust and a luscious cherry filling creates a harmonious balance that is hard to resist. Plus, they are incredibly easy to make, allowing you to whip up a batch in no time. Whether you enjoy them warm with a scoop of ice cream or chilled as a refreshing snack, Ruby Red Cherry Bars are sure to become a staple in your dessert repertoire.

Ingredients:
- 1 cup all-purpose flour
- 1/2 cup granulated sugar
- 1/4 teaspoon salt
- 1/2 cup unsalted butter, softened
- 1 large egg
- 1 teaspoon vanilla extract
- 1 cup cherry pie filling (or fresh cherries, pitted and chopped)
- 1/4 cup powdered sugar (for dusting)
- Optional: 1/2 teaspoon almond extract for added flavor
Preparing the Batter
- Preheat your oven to 350°F (175°C). Grease an 8×8 inch baking pan or line it with parchment paper for easy removal.
- In a medium mixing bowl, combine the all-purpose flour, granulated sugar, and salt. Whisk them together until well mixed.
- Add the softened butter to the dry ingredients. Using a pastry cutter or your fingers, mix until the mixture resembles coarse crumbs.
- In a separate small bowl, beat the egg and then add the vanilla extract (and almond extract if using). Mix well.
- Pour the egg mixture into the flour mixture. Stir until just combined, being careful not to overmix. The batter will be thick.
Preparing the Cherry Filling
- If using fresh cherries, pit and chop them into small pieces. If using canned cherry pie filling, simply open the can and stir gently to break up any large clumps.
- Set the cherry filling aside while you prepare the baking pan.
Assembling the Bars
- Take about two-thirds of the batter and press it evenly into the bottom of the prepared baking pan. Make sure to spread it out to cover the entire base.
- Once the base is ready, spoon the cherry filling over the batter, spreading it out evenly. Make sure to leave a little space around the edges to prevent overflow during baking.
- Take the remaining batter and crumble it over the cherry filling. It doesn’t have to cover the filling completely; some gaps are fine as it will spread while baking.
Baking the Bars
- Place the baking pan in the preheated oven and bake for 30-35 minutes, or until the top is golden brown and a toothpick inserted into the center comes out clean.
- Once baked, remove the pan from the oven and let it cool in the pan for about 10-15 minutes.
- After cooling, carefully lift the bars out of the pan using the parchment paper (if used) and transfer them to a wire rack to cool completely.
Serving the Ruby Red Cherry Bars
- Once the bars are completely cool, dust the top with powdered sugar for a beautiful finish.
- Cut the bars into squares or rectangles, depending on your preference.
- Serve them on a platter or store them in an airtight container at room temperature for up to a week.
Tips for Perfect Cherry Bars
- For a more intense cherry flavor, consider adding a splash of cherry juice or a few drops of cherry extract to the filling.
- If you prefer a more tart flavor, you can mix in a tablespoon of lemon juice with the cherry filling.
- These bars can also be served warm with a scoop of vanilla ice cream for a delightful dessert.
- Feel free to experiment with different fruits, such as blueberries or raspberries, for a variation on this recipe.
Storage Instructions
- Store any leftover bars in an airtight container at room temperature for up to a week.
- For longer storage, you can freeze the bars. Wrap them tightly in plastic wrap and then place them in a freezer-safe container. They can be frozen for up to three months.
- To thaw, simply leave them at room temperature for a few hours or microwave them for a few seconds until warmed through.
Final Thoughts
These Ruby
Conclusion:
If you’re looking for a delightful dessert that combines the tartness of cherries with a sweet, buttery crust, then these Ruby Red Cherry Bars are an absolute must-try! The vibrant color and rich flavor of the cherries not only make these bars visually appealing but also create a deliciously satisfying treat that’s perfect for any occasion. Whether you’re hosting a summer picnic, celebrating a birthday, or simply indulging in a sweet craving, these bars are sure to impress your family and friends.
One of the best things about Ruby Red Cherry Bars is their versatility. You can serve them warm with a scoop of vanilla ice cream for a comforting dessert, or enjoy them chilled with a dollop of whipped cream for a refreshing treat. For an extra touch, consider drizzling a bit of chocolate sauce over the top or sprinkling some crushed nuts for added texture. If you’re feeling adventurous, you can even experiment with different fruits! Substitute the cherries with blueberries, raspberries, or even a mix of your favorite berries to create a unique twist on this classic recipe.
I encourage you to give these Ruby Red Cherry Bars a try! The process is simple, and the end result is nothing short of spectacular. Plus, they’re perfect for sharing—so don’t forget to bring a batch to your next gathering. I would love to hear about your experience making these bars! Did you stick to the original recipe, or did you try out any fun variations? Share your thoughts and any tips you might have in the comments below.
Remember, baking is all about creativity and having fun in the kitchen, so don’t hesitate to make this recipe your own. I can’t wait to see how your Ruby Red Cherry Bars turn out! Happy baking!
Ruby Red Cherry Bars: A Deliciously Easy Recipe to Try Today
Enjoy these Ruby Red Cherry Bars with a buttery, crumbly base and a sweet cherry filling. They're easy to make and perfect for dessert or a snack, sure to impress anyone who tries them!
Ingredients
- 1 cup all-purpose flour
- 1/2 cup granulated sugar
- 1/4 teaspoon salt
- 1/2 cup unsalted butter, softened
- 1 large egg
- 1 teaspoon vanilla extract
- 1 cup cherry pie filling (or fresh cherries, pitted and chopped)
- 1/4 cup powdered sugar (for dusting)
- Optional: 1/2 teaspoon almond extract for added flavor
Instructions
- Preheat your oven to 350°F (175°C). Grease an 8×8 inch baking pan or line it with parchment paper for easy removal.
- In a medium mixing bowl, combine the all-purpose flour, granulated sugar, and salt. Whisk them together until well mixed.
- Add the softened butter to the dry ingredients. Using a pastry cutter or your fingers, mix until the mixture resembles coarse crumbs.
- In a separate small bowl, beat the egg and then add the vanilla extract (and almond extract if using). Mix well.
- Pour the egg mixture into the flour mixture. Stir until just combined, being careful not to overmix. The batter will be thick.
- If using fresh cherries, pit and chop them into small pieces. If using canned cherry pie filling, simply open the can and stir gently to break up any large clumps.
- Set the cherry filling aside while you prepare the baking pan.
- Take about two-thirds of the batter and press it evenly into the bottom of the prepared baking pan. Make sure to spread it out to cover the entire base.
- Once the base is ready, spoon the cherry filling over the batter, spreading it out evenly. Make sure to leave a little space around the edges to prevent overflow during baking.
- Take the remaining batter and crumble it over the cherry filling. It doesn’t have to cover the filling completely; some gaps are fine as it will spread while baking.
- Place the baking pan in the preheated oven and bake for 30-35 minutes, or until the top is golden brown and a toothpick inserted into the center comes out clean.
- Once baked, remove the pan from the oven and let it cool in the pan for about 10-15 minutes.
- After cooling, carefully lift the bars out of the pan using the parchment paper (if used) and transfer them to a wire rack to cool completely.
- Once the bars are completely cool, dust the top with powdered sugar for a beautiful finish.
- Cut the bars into squares or rectangles, depending on your preference.
- Serve them on a platter or store them in an airtight container at room temperature for up to a week.
Notes
- For a more intense cherry flavor, consider adding a splash of cherry juice or a few drops of cherry extract to the filling.
- If you prefer a more tart flavor, you can mix in a tablespoon of lemon juice with the cherry filling.
- These bars can also be served warm with a scoop of vanilla ice cream for a delightful dessert.
- Feel free to experiment with different fruits, such as blueberries or raspberries, for a variation on this recipe.
Leave a Comment